ZBrush Tips and Tricks: Enhance Speed and Efficiency
You are looking for Zbrush tips and tricks necessary for seamless projects and amazing results? Sculpting software like ZBrush needs a big mesh if they are going to cope with the intricate 3D models that artists produce. Although most people would advise you to work on a low-res version of your model so that your workflow is smooth and malleable, spending all your time on something so unchallenging can get pretty dull.
Many of us yearn to start pushing ourselves by working on high-res files with loads of complex detail–but if you’re using ZBrush don’t forget: lots more polygons equals lots more strain on your machine! Specifically, if you’ve got a computer or laptop with rather humble specifications this kind of thing might prove too taxing for it.
ZBrush does warn you about system speed though (in conjunction with active memory). If ever while working your free it goes above say 2000-3000 then yes definitely–go into ‘Compact Now’ mode ASAP! Even if it wasn’t particularly strong, after doing this plus clearing cache, etc., one can still work on heavy-duty operations as if nothing fazes them in preferences > memory compact memory.
Lazy Mouse: Zbrush tips and tricks
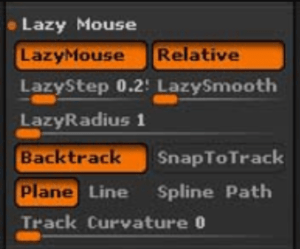
Some ZBrush tips and tricks may give you advantages for sure. When the Lazy Mouse feature is turned on, drawings will follow the cursor with a slight delay. A red line shows this movement on the screen – it’s great for controlling precisely where you paint or draw lines. To turn this feature on or off:- Go to Stroke > Lazy Mouse, or press L.
If you don’t find the tool helpful at first (maybe because there seems to be too much lag), experiment with the settings:- Preferences > Tablet > Lazy. Changing the value from 0. 5 to 1 will give less delay and can feel more like regular drawing or painting.
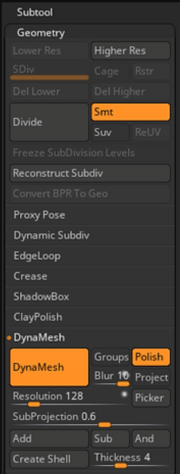
DynaMesh
Should you be utilizing software such as Maya or other 3D programs to create your model with the ultimate goal being to finalize a high-end sculpting model, then at some juncture you will want to make use of the ZBrush tool.
Bring the low-resolution 3D model into ZBrush and use DynaMesh to give it uniform polygons across the surface — which will stick there permanently. This forms a high-resolution grid that’s very useful.
From now on, anything you might like to do with this model in ZBrush is allowed: It’s ready to go through all stages of production. Sculpt, texture-map — even both at once!
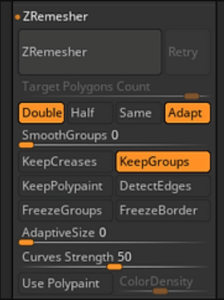
ZRemesher
Some ZBrush tips and tricks may give you advantages for sure. When the Lazy Mouse feature is turned on, drawings will follow the cursor with a slight delay. A red line shows this movement on the screen – it’s great for controlling precisely where you paint or draw lines. To turn this feature on or off:- Go to Stroke > Lazy Mouse, or press L.
If you don’t find the tool helpful at first (maybe because there seems to be too much lag), experiment with the settings:- Preferences > Tablet > Lazy. Changing the value from 0. 5 to 1 will give less delay and can feel more like regular drawing or painting.
Clowning
If you have used a texture-creating tool such as Quixel Bridge plugin in UE 5 or Substance Painter, there might be a color ID mask that you made during that process. And if this is the case then ZBrush can make good use of them. Instead of having to spend your time assigning Clowns (or Masks) in ZBrush why not let ZBrush do it for you?
ZBrush is clever enough to realize that when you import texture maps there could be something useful for it within the Clown information. By going to Preferences: Import Export you can tell ZBrush to change these Clowns into Polygroups upon importation – saving valuable time later on. Although other software might treat Clowning as an entirely separate material for each color applied, when using ZBrush with anything exported from some kind of 3D mesh modeling system (for example) things are different.
ZBrush Preferences
 ZBrush Settings ZBrush boasts an extensive array of Brushes – music to the ears of any artist employing its digital sculpting toolset.
But with great brush count comes a complex chore: each has its modifiers… and it’s all too easy to forget this.
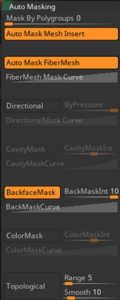
Backface masking is vital when working with thin parts of a model, and enabling this option by default could save you some frustration down the line.
Brush > Auto Masking > Backface Mask
Don’t forget to activate the Backface Mask whenever you switch brushes.
Unless they have been saved with these settings enabled specifically for them, newly created tools won’t benefit from such protection against unwanted changes happening on their unseen surface areas
ZBrush Settings
When talking about brushes, it is important to also mention brush modifiers. For example, enabling BRadius to use a clip will cause a curve brush to assist in working faster – which is especially handy when sculpting things like hard surfaces or block-outs! In this case, remember that the radius of your brush defines the depth of geometry insets.
Morph Target Modelling
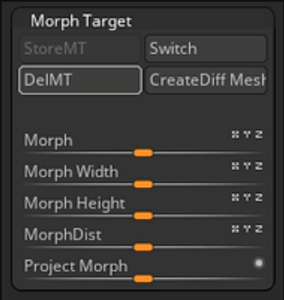 The method is used to sculpt a morph target and edit the target geometry to generate a new mesh out of it. There are multiple techniques you can create a new mesh from target geometry.
Start sculpting on a PM3D mesh. You should store the morph target to continue the sculpting on the mesh.
After your sculpting session is completed and you are happy with the output, go to the Morph Target palette and click on Create Diff.
You will immediately see a new mesh added to the tool palette. New meshes may have their Normals inverted sometimes.
To fix this, go to Tools > Display Properties > Flip.
UV Master
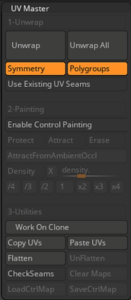 UV mapping has long been considered a daunting task by most 3D artists – something they would avoid if at all possible. The hours of painstaking work needed to “unwrap” models are repetitive and incredibly dull. When working alongside Maya for example, creating UV layouts for objects becomes more straightforward:
You can export an OBJ file from within Maya of a 3D model you’re making, then bring it into ZBrush.If you want to keep refining this new layout back in Maya there is a workflow that might help. Start by loading the identical mesh you exported into ZBrush; any changes you make to its flattened UV maps (created with the aforementioned plugin) will appear on-screen straight away.
Another nice workflow addition is to create UV ‘playgroups’ for models made in Maya that you plan to be working with in Zbrush. To do this use the color ID information produced by either program so they have different mats assigned. Then when you’re next in Zbrush select a sub-tool and head to its lowest subdivision level.
Select ZPlugin > UV Master > Polygroups and Work on Clone. Unwrap All to create a new UV Layout.
Paintshop
You don’t have to switch over to a fully-fledged program like CorelDraw or Illustrator if you want to make a quick sketch. Even if you’re busy working with ZBrush, there’s no need to fire up MS Paint! Why?
Because within ZBrush, there is a fantastic tool called Paint Shop — and it’s built right in. Even though, Paint Shop isn’t a sophisticated drawing application found in high-end software packages, and wasn’t designed to be.
Digital artists will still find lots of uses for it, especially those who enjoy painting. This is because it comes complete with an impressive array of tools.
For example, when using ZBrush you can create flattened images onto which you paint. The cool thing: if you then transfer this color information onto a 3D mesh; the artistic possibilities are endless!
Tools Brightness Adjustment
It can be difficult to locate the selected tools when many tools are open simultaneously on your screen, with sub-tools and panels compounding the issue. The current tool is highlighted in a lighter color, which helps; however, it is also possible to take things further by increasing the brightness level overall.
Take control over how bright (or not) individual tools appear: go to Preferences > Edit > Inactive Sub-tool Dimming. There you can adjust shading effects along with brightness levels, using slider bars that let you make all non-selected tools darker while leaving the selected one alone (and vice versa).
Faster Workflow
For a faster workflow on ZBrush, using the keyboard and especially using the spacebar all the time provides you with easy shortcut methods to access various types of tools. One of the useful functions it caters to is:
- Brush – Changing the size, focal shifting
- Polypainting Options
- Changing material
- Color picker
- Another important feature in the space bar is to instantly locate the mouse cursor while it is outside the viewports of ZBrush.
Background Color Change
Even though the default background color in ZBrush appears as a nice gradient while you are sculpting objects, some designers may find it preferable to work on a single-color background rather than a graduated one. If you fall into this group, here’s a tip for you: Changing the default gradient is easy. Simply go into the Document palette and set Range to zero (0). This eliminates the gradient effect— turning everything in the background into a solid grey.
Of course, you might want more than just grey. In which case pick your chosen color by sliding the Back grid color above the Range slider, then selecting a shade from the screen that appears. It would be impossible to list every tip and trick for such huge programs as ZBrush. So we have collected together some of the most common tricks — all of which could be described as being of moderate difficulty — that will help newcomers get up to speed with their workflow. We hope that by reading through these 15 bite-sized pieces of advice you will be able to understand how ZBrush works a little better (or at least differently) than before; enabling you to become more accustomed to the great facility!
Conclusion: Take the Next Step
Hope you reached to the end of our ZBrush tips and tricks article. To unleash the full power of ZBrush, it is important to remember that simply having technical knowledge isn’t enough; you also need to be creative. If you follow our advice about small changes that make a big difference then your sculpting will improve greatly – meaning not only will each job take less time but they’ll look better too!
Remember: – Making your computer run as efficiently as possible will help prevent crashes or other problems from happening while working with this program.– There are tools within ZBrush such as DynaMesh and ZRemesher which can do lots of work for you very quickly (as long as their settings have been adjusted properly).
Other suggestions include changing default options including those controlling how brushes behave plus what happens when an item’s rear surface is masked out; color behind everything seen on screen & exploring additional methods like using keyboard shortcuts more than ever before alongside techniques such. If interested there are plenty more resources available such as our academy program, different courses, masterclasses, and more. Learn about the requirements and conditions to enroll before taking any step. Make the right decision join us today and make your dream today a reality tomorrow.

