ZBrush Tips and Tricks: Enhance Speed and Efficiency
Looking for essential ZBrush tips and tricks to improve your workflow and achieve better sculpting results? ZBrush is one of the most powerful digital sculpting tools available, but working with detailed 3D models can quickly become demanding on your hardware.
While many artists recommend starting with low-resolution meshes for a smoother workflow, eventually you will want to work with high-resolution models filled with complex details. However, more polygons also mean more processing power is required.
ZBrush provides tools to help manage performance. If your active memory usage becomes too high, using features such as Compact Now and clearing unnecessary cache data can help maintain a faster workflow.
Lazy Mouse: Improve Precision While Sculpting
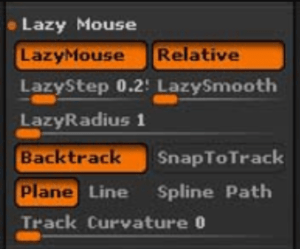
One of the most useful ZBrush features for improving precision is Lazy Mouse. When enabled, your strokes follow the cursor with a slight delay, creating smoother and more controlled lines.
To enable Lazy Mouse:
Stroke > Lazy Mouse
Shortcut: L
If the delay feels uncomfortable, adjust the settings under:
Preferences > Tablet > Lazy
Increasing the value from 0.5 to 1 reduces the delay and creates a more natural drawing experience.
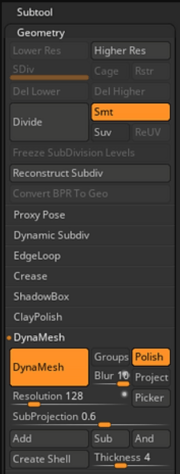
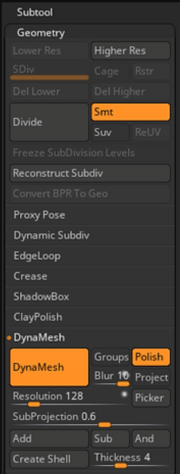
DynaMesh: Create Flexible Sculpting Geometry
When bringing models from software such as Maya into ZBrush, DynaMesh is an essential tool for preparing your mesh for detailed sculpting.
DynaMesh automatically creates an evenly distributed polygon structure across the surface of your model, allowing you to freely sculpt, add details, and modify shapes without worrying about stretched geometry.
Once activated, your model becomes ready for advanced sculpting, texturing, and refinement workflows.
ZRemesher: Optimize Your Mesh Automatically
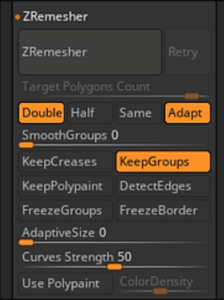
ZRemesher is one of the most powerful ZBrush tools for creating cleaner topology. It automatically rebuilds your mesh while preserving important surface details.
This is especially useful after sculpting high-resolution models, as it creates cleaner geometry that is easier to animate, texture, and export.
Using Color IDs and Polygroups Efficiently
If you have created color ID masks using tools such as Quixel Bridge or Substance Painter, you can use this information inside ZBrush to speed up your workflow.
Instead of manually creating Polygroups, ZBrush can convert imported color information into Polygroups automatically. This saves time when working with complex models.
Optimize Your ZBrush Preferences
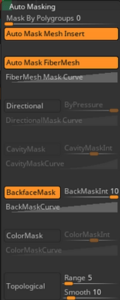
ZBrush includes hundreds of brushes and customization options. While this flexibility is powerful, it is easy to forget important settings that affect your workflow.
Enable Backface Masking
Backface masking prevents accidental sculpting on the opposite side of thin geometry. This is especially useful when working on detailed models with narrow surfaces.
Enable it through:
Brush > Auto Masking > Backface Mask
Brush Settings and Modifiers
Brush modifiers can significantly improve your sculpting speed. For example, adjusting brush radius settings can make hard-surface sculpting and blockout creation much faster.
Understanding how brush depth, intensity, and falloff affect your strokes allows for greater control over your models.
Morph Target Modeling
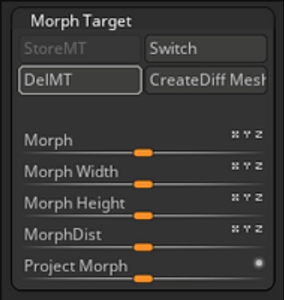
Morph Targets allow artists to store a version of their mesh and create new geometry variations from it.
To create a morph target workflow:
- Start sculpting on a PM3D mesh.
- Store the current mesh using the Morph Target palette.
- Modify your sculpt.
- Select Morph Target > Create Diff.
If the new mesh has inverted normals, fix it through:
Tool > Display Properties > Flip
UV Master: Simplify UV Mapping
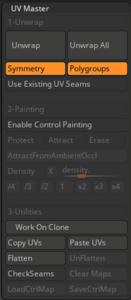
UV mapping can be one of the most time-consuming parts of 3D production. ZBrush’s UV Master plugin helps artists quickly create UV layouts directly inside the software.
A common workflow is exporting a model from Maya, importing it into ZBrush, creating UVs with UV Master, and then continuing refinement in your preferred 3D software.
To use Polygroups for UV creation:
ZPlugin > UV Master > Polygroups > Work on Clone > Unwrap All
PaintShop: Quick Painting Inside ZBrush
ZBrush includes a built-in PaintShop feature that allows artists to quickly create and edit painted textures without switching to another application.
While it is not designed to replace professional painting software, it can be useful for quick sketches, texture ideas, and experimenting with color directly inside ZBrush.
Adjust Tool Brightness for Better Organization
When working with many sub-tools, it can become difficult to identify the currently selected object.
You can improve visibility by adjusting:
Preferences > Edit > Inactive Sub-tool Dimming
This allows you to make inactive tools darker while keeping the selected tool easier to identify.
Speed Up Your Workflow With Shortcuts
Keyboard shortcuts are one of the fastest ways to improve efficiency in ZBrush. The spacebar menu provides quick access to important options, including:
- Brush size and focal shift
- Polypaint options
- Material selection
- Color picker
- Quick navigation tools
Change the ZBrush Background Color
ZBrush uses a gradient background by default, but some artists prefer a solid color for better focus.
To remove the gradient:
Document Palette > Range > 0
You can also customize the background color using the Back Grid Color option.
Conclusion: Improve Your ZBrush Workflow
Mastering ZBrush requires both technical knowledge and artistic creativity. Small workflow improvements can save hours of work while helping you create better sculptures.
By optimizing performance settings, learning tools such as DynaMesh and ZRemesher, customizing brushes, and using shortcuts effectively, you can make your sculpting process faster and more efficient.
Want to develop your 3D skills further? Explore our academy programs, specialized courses, and masterclasses taught by industry professionals.
Learn about the requirements and enrollment process and start your journey today toward becoming a professional 3D artist.