Create 3D models for environments with a dragon skull as an example. Discusses high-poly modeling in ZBrush or Maya for low-poly creation.
Emphasizes references and experimentation, detailing techniques, mesh separation, and procedural details with ZBrush's noise plugin.Touches on retopology, UV unwrapping, and shader assignments for Substance Painter.
Workflow for low-poly modeling in Maya and high-poly sculpting in ZBrush, optimizing poly count, using beveling, curve tools for modeling, and UV generation.
Modeling - Full Pipeline
- Workflow
Every sculpture will start with one of the basic shapes inside ZBrush.
For this one, we are starting with a sphere and slowly shaping it into the head of a dragon.
Use DynaMesh to fix the topology when making major changes to the clay.
Slowly build up and add to the shape.
Work with shapes you already have, duplicate the teeth, and move them around to save time on making a tooth from scratch every time.


Horns might look hard to make, but they are only 2 spheres dragged out with the SnakeHook bush and DynaMeshed to fix the topology.
When sculpting horns or teeth, we need to make the seams where the teeth or horns are coming out.
There is also more clay build-up around the teeth where the gums would be, this can also apply to the horns.
To split anything that is grouped together, mask one part then in the subtool use the SplitHidden tool.
Now that we have the basic shape for the horn we can add details using the mask brush and gizmo tool.
Mask some parts of the horns, then with the gizmo, scale down the masked parts to create the indents between the horns.
Once we reach a point where we need more topology, instead of using DynaMesh we can switch to using Divisions instead.


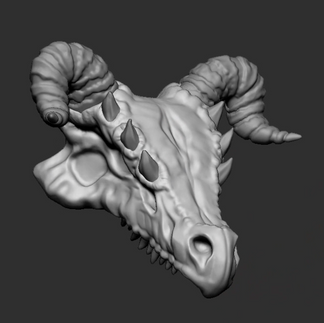
Holes are easy to make in ZBrush using Booleans.
It needs to be activated from the top left corner of the UI, after activation, use any of the basic shapes to subtract parts of the sculpt from the layers.
If you want higher-quality details, you’ll need to add more Divisions to the model.
It’s best at this point to duplicate, ZRemesh and project details on the duplicate from the original model so that there is a low and high poly model in one mesh instead of retopologising the model later.


In the Subsurface tab, there are Noise modifiers you can use to add texture to the model.
Be sure to use the noise curve to change the noise.
The Layers in ZBrush also provide better control over the noise texture.
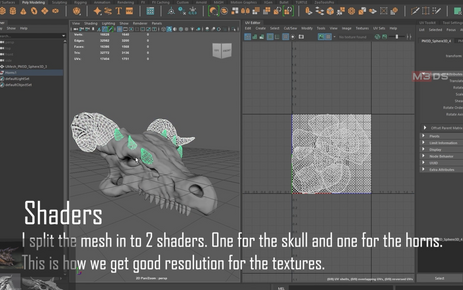
After we’ve added all the details and finished the model, export the model in the lowest subdivision so that we can open UVs for it inside Autodesk Maya.


Import the low poly model in Maya by dragging and dropping the FBX file in the scene.
Open a Planar UV for the skull since there won’t be any UVs shown in the UV Editor.
Once we have the UV Shells shown, we can start cutting the UVs for the skull using the Cut and Sew tools from the UV tools.
Depending on how complex the model is, it can have one or multiple shaders.
For this skull, we’re adding 2 shaders, one for the skull and one for the horns.
After the UVs and Shaders have been made, re-export the low poly mesh.


Low and High Poly
Some props will be started and made in Autodesk Maya.
The props made in Maya will be our low poly models that don’t have a high number of polygons and have UVs.
We’ll export those props one by one into FBX files and work on them in ZBrush to create the high poly.
This means we add more topology to the model so that we can add the details.
If the mesh doesn’t have enough topology, the brushes won’t be able to make high-quality strokes.


Sculpting Cloth
Cloth can be made using the gravity simulation inside of ZBrush.
Place a plane above whatever you want to have cloth, add divisions, and use Dynamic divisions to add thickness to the cloth so it’s double-sided.
This will also help us to add details with some custom cloth brushes on the cloth once the simulation is done.
In the Dynamics tab, set the gravity settings and run the simulation.
Once you are satisfied stop the simulation.
Use any brush if you don’t have custom cloth brushes to add the details.


Tree It
Trees can be created in Maya or ZBrush but there is also an alternative software that is made to create 3D Trees.
The software is called Tree It.
In this software, we can create trees, and control their shape, color, and size.
The settings are simple and easy to use, and most of them are sliders that can be easily adjusted to get the desired shape.


Create a variety of different types of trees, at least 4-5 types so that the scene doesn’t look repetitive.
There are also different types of leaves you can place on the trees, control the size and the color.
There is also an option to create a gradient of colors for said leaves.
After making each tree, export the textures and the model.


Scaling
Just like how we scaled the block out, we need to scale the models before importing them inside of unreal.
Add a Male Character model as a scale reference from the Content Browser.
Make sure that everything is in the middle of the grid before exporting as well.


Once everything has been scaled and exported, import them inside the Unreal Project to replace the blockout.
Move the objects to the position where the blockout is then delete it.