The instructor covers Unreal Engine basics like viewport navigation, essential panels, object manipulation, and level management, emphasizing the main or "persistent" level.
The tutorial targets beginners, teaching game design fundamentals, blueprints, level sequencers, cinematics, character design, and more through progressive levels, culminating in practical application.
- Workflow
In this tutorial, we’ll be explaining the basics and the layout of Unreal Engine 5.
In the Epic Games Unreal Engine marketplace, there are many different free projects available for download.
For this tutorial, we’re using the Unreal Gaming Kit.
Click on the kit and add the project to your Unreal Engine project folder.


We have a pre-build layout of a level given to the students that follow the classes in the Academy Year 2 program.
To play the level, click on the play button in the top left corner.
Whenever you want to exit out of play mode, click Escape on your keyboard.
When inplay mode, don’t add anything into the scene because once out of the mode, all the placed objects will disappear.
On the top left corner is the name of the project.
If there is a star next to the project, that means there are unsafe changes.
There is a safe icon below the project name, clicking it will save any changes made to the project.
If you want to re-set the UI, click on the Windows tab, open the Load Layout and click the Defailt Editor Layout.


Add the Levels sub-menu to your scene, you can find it inside the Windows tab.
Drag and drop the Levels sub-menu on the right side next to the Outliner.
Again the the Windows tab, open the World Settings sub menu.
The sub-menu will automatically add itself below the outliner, next to the Details.
If by chance it is a window in the middle of the project, drag and drop it next to the Details sub-menu like we did with the Levels window.


Another thing we want to add to our UI is the Place Actor. Click on the cube icon below the project name and add the Place Actor.
The window will doc itself on the left side of the workspace.
Here we have access to the basic shapes inside of Unreal, lights, cameras, and other simple tools that are used often.
To move around the world, use the mouse and arrow keys like you would playing a video game.
Holding down the right mouse button and moving it around, we’ll move the direction of the camera.
Using the E key we can ascend, while the Q key descends the camera.
You can also use the same movement as in Autodesk Maya.


Every time an object is selected inside the scene it will be outlined inside the Outliner.
The Outliner behaves like a folder and keeps track of everything being placed inside the scene.
The Details sub-menu is where you can make changes to the selected objects.
For now, we’ll only talk about the Transform options inside the Details sub-menu.
There you can see the coordinates of the Location, Rotation, and Scale of the selected object.
The location is the place the object is placed in while the rotation and scale are the angle and side of the object that is currently in.
If there isn’t anything selected, nothing will appear in the Details sub-menu.


W is the move tool, R is the rotate tool and E is the scale tool inside of Unreal Engine.
When the object is rotated, the pivot will always point to the World Position.
To change this, on the top right corner, click the world icon, and the pivot will now always point to the Objects position.


When moving, rotating, or scaling the object there is a snap to it instead of a smooth change.
This is because the snapping is enabled on each tool.
To disable the snapping, click the snap icon on each tool to disable it.
If you want to keep the snapping, there is a number on each tool icon that allows you to change the intensity of the snapping by changing to a different value.
In this line of icons, there is the camera speed.
The camera speed can be changed using the slider or putting in a different value on your own.
While moving in the world, if you scroll down with the middle mouse, the camera speed will decrease, and scrolling up will increase the camera speed.


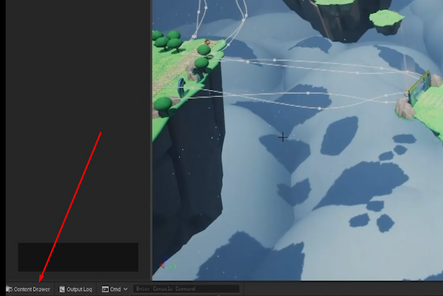
Every time you’ll be working on a game project, all of the assets, textures, levels, and blueprints will be placed inside the Content Drawers.
You can click the icon on the bottom left corner to open it or use the Ctrl + Space shortcut.
If you move the scene, the Content Drawer will close.
If you want to prevent this, click on the Dock Layout button inside the Content drawer to permanently dock it.


In the Layer sub-menu, we can see that we can hide and reveal levels.
Anything placed on that level will be hidden.
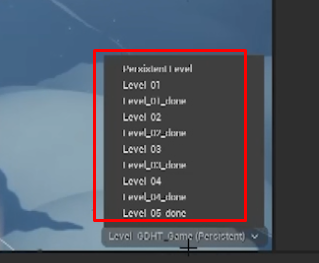
There is also a hierarchy system for the levels.
The main level is the project level itself while everything else below it is all the small scenes made inside the project.
On the lower right corner of the workspace, we can see which level we are currently working on.,
Clicking on the name will open up a list of all the existing levels inside the project.


To add and make a new level for the level hierarchy, inside the content drawer, open the levels folder and right-click in the empty space.
Select the Create level icon to make the new level.
Rename it into TestLevel.
When you double-click it, it will only show a black screen, that is because we have nothing placed inside the level, not even lights.
Open the content drawer again, and double-click on the GDHT level or the main level where all the other levels are placed.
To add the TestLevel inside the hierarchy, click the arrow on the Levels options and click on the Add existing button.
Locate the level and open it.


When placing assets inside the scene we can see in which levels we are adding them into by looking at the lower right corner.
To delete a level from the hierarchy, select it and press the Delete key.
Anything placed in the level will be removed too.
Deleting a level can not be undone.
After deleting it from the hierarchy, we can then delete it from the content drawer.