
🟥Learn how to create realistic eyebrows and eyelashes using Xgen in Maya with this comprehensive tutorial.
🟥Master the process of placing and shaping guides, adjusting density, and applying modifiers for the perfect look.
- Workflow
Today we’ll be making facial hair on a head mesh using XGen in Autodesk Maya.
Before we start working on the base mesh we’ll go over some important steps and skills we need to know beforehand to make the process of creating facial hair on a person easier.
We’ll start off by adding a sphere into the workspace and scaling it up significantly.
Change the Workspace from General to XGen.
If we select the entire sphere and create a Description, we won’t have surface limitations on where we can place the guides for the hair.
But, if we only select a few faces and then make a Description we will only have permission to add guides to that area and nowhere else.
For this example, we’ll select two rows o faces and click on the Create New Description button.
A small window will open and here we need to add the Name of the Description, name the new Collection, and in the Control Primitives select the Placing and shaping Guides so we can add in the guides on our own.
After we’ve set everything click on the Create button


Once we clicked on the Create button more tools will appear in the XGen tab.
The first tool we’ll use is the Add Guides tool.
We can only add these guides on the faces we’ve selected as we were making the description.
Add one guide at the corner of the faces and scale it with the scale tool so it isn’t so small.
If the guide is small, the hairs will also be that length.
After we’ve scaled it, select the Sculpt Guides tool to curve the guide.


Add a few more rows of guides, scale, and curve them to match each other.
When we click on the eye icon in the XGne tab it will give us a preview of how the hair looks so far.
If we turn on the geometry view we can see that the hair only covers the faces that have Descriptions on them and nothing else.


To add more hair around the guides, we need to change the Density inside the Primitives tab.
The higher the value the more hair will appear.
Modifiers play a big role to make any type of hair we want to add to our model look natural.
We’ll add a Clump modifier so that we can clump the hair around the guides and not let them hang around everywhere.
After selecting the Clump modifier, click on Setup Maps.
A new window will open on your screen, and through here click on the Guide button so that the clumping happens around the guides, after that click on the Save button.
We can see now that the hair has clumped around the guides.


We can go back to the Primitives tab and adjust the Width f the guides and the Width Ramp.
The width is how wide the hairs are and the Width Ramp is to set if the Root or Tips of the hair should be thinner or thicker.
The Modifier CV Count value is for how well the hairs follow the guides.
If the value is greater the hairs will follow the guides as perfectly as possible.


If we want to add guides that have their own modifiers and Primitives settings, separate from the ones that we’ve worked on, we need to make a new Description for them.
Select a bottom row of faces, open up the Descriptions tab, and click on Create Description.
The same window will pop up as in the beginning but this time it will automatically select the Add Description to existing Collection, and it will have the name of the first collection we made at the start of the class.
The only thing we need to change is the Description name and select the Placing and shaping Guides option.
When we click create we’ll have the Bottom Description inside the TestCollection in the Description tab.
In this tab, we can switch between the Top and Bottom descriptions and work on them separately.
If we try and add guides while on the Bottom Description, it will only let us add guides on the faces we selected when we made the new description.


There’ll also be a new icon next to the preview that lets us turn off other guides so they don’t get in the way.
If we want to turn off the Top guides we first need to select the Top Description and then turn them off from there.
Add new guides on the Bottom description, for the hairs to be longer, scale up the guides with the scale tool.
As we did before, use the Sculpt Guides tool to curve them, this time downwards.
Add more Density in the Primitives tab, and a Clumping modifier.


Now that we went over the basics we can switch to the head mesh and begin adding the facial hairs.
Start off by selecting the faces where the eyebrows will be and Create a Description.
Add guides and form them using the Sculpt Guides brush.
After adding in a good amount of guides, check how the hairs will look in the preview.
If the hairs look off or misplaced, turn off the preview and keep adding or adjusting the guides till the hairs look decent enough.
We will be fixing the hair flow using modifiers.
If the hairs look too thick, change the Width value in the Primitives tab.
You can also increase the density as you work on the eyebrows, the higher the value the more hairs will appear around the guides.
To make the tips of the strands thinner, lower down the T side of the Width Ramp graph.


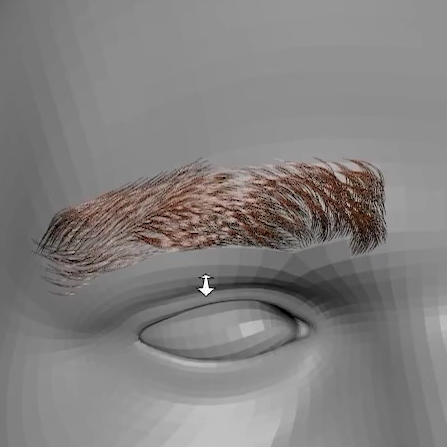
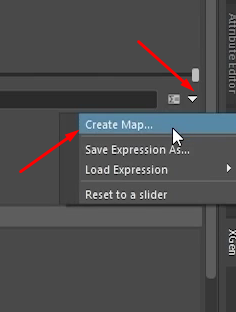
To thin out the shape of the eyebrow we’ll make a mask and mask out which parts we don’t want there to have any hair.
In the Mask options, at the very end there is a small arrow pointing down, click it and click the Create Map option.


The mesh will turn white and the cursor will become a brush.
The black value will prevent any hairs from showing up on that area, the white value lets hairs appear there and the grey value is a mix of both where some hairs will appear but not in a big amount.
To see the changes the mask is doing to the guides, click the small Save icon near the Mask options.
If you deselect the masking brush, click the brush icon near the Mask options to turn on masking again.


Once we are done shaping the eyebrow, add a clumping modifier but instead of clicking on the Guides when we are Setting up the Maps, click on Generate instead and increase the Density.
Doing this will generate guides for the clumping instead of using the ones we added to make the eyebrows.
After that click Save like usual.
We can see that the eyebrow doesn’t look so smooth anymore and it is starting to look more natural.


We can add another Clump modifier to the guides this time with the standard Density value of 1.
Click on Generate again and then save to finalize the clumping.
After the Clump modifiers, we can add some Noise to ruffle up the strands.
The magnitude is how much the noise affects the strands and the Magnitude scale is where the Magnitude will affect the strands more, the Roots or the Tips.
It’s best to fidget with the settings on your own to figure out how to use this modifier and what suits you best when working with it.
The values used for this class are shown in the image below.


Lastly, we can add the Coil modifier to make the strands a bit curly.
At first, it’s going to look like a mess but when we adjust the Radius value it won’t impact the brow so much.
The values for the changes are provided in the image below, it’s best to fidget with the values on your own to have a better understanding of what each value does.


To mirror the guides to the other side to form the second eyebrow, select the guides and click on the Mirror Selected Guides.
Sadly our mask won’t get mirrored so we’ll have to draw it on the opposite side.
No need to make a new mask, just click on the paintbrush icon near the end of the Mask option inside the Primitives tab and start masking.


Now that the eyebrows are done we can move on to the eyelashes.
Select the top 2 rows of faces above the eyelid to make the top eyelashes.
Create a new description named TopEyeLash and make sure you have the Control Primitives set to Placing and shaping Guides.
Add in the guides and shape them using the Sculpt Guides tool.


Increase the Density value to add more hairs.
Change the Length value if the eyelashes are too long/short.
The Width is the thickness of the strand, if the eyelashes are too thick lower the Width value.
With the Width Ramp adjust where the strands will be thicker/thinner by lowering or increasing the two sides.
After making some adjustments inside the Primitives tab, we’ll add a Clumping modifier with Generate and Guide this time.
Decrease the clump value a bit if the hairs are clumping too close to each other.


There will be a lot of back and forth between the Primitive settings and the Modifier settings.
You won’t be able to get it right the first time and will require a lot of tinkering and going back and forth.
Back in the Primitives change the width and the Width Ramp to the values in the image below.
After changing the value of the Width, add a Noise modifier.
Adjust the Frequency, Magnitude, and the Magnitude Scale.
If the clumping is too much, select every second guide and delete them.
To re-set the clumping, go into the Clumping modifier settings, click on Setup Maps, and click on Guide and Svae.


Add new guides to replace the old ones.
In the Clump settings, change the Clumping value to 0.7.
Adjust the Noise Settings as well like in the image below.
Add a Cut modifier and input a value inside the Amount to determine the maximum and minimum length size of each strand.
Lastly, add a Coil modifier and input the values from the image below.


To make the Modifiers better interact with the guides and the hair, go into the Primitives settings and increase the Modifier CV Count to 10.
One last touch is to add a Map and mark out which areas we don’t want hair to spawn around the upper eyelid.


Finally, select the eyelash guides and mirror them.
There will be a glitch where the hairs are deformed to the side and that is because of the Clumping modifier.
We need to re-set it and to do that we need to go into the Clumping settings, Setup Maps, and click the Guide button before saving.
Use the masking brush and mask out the other eyelid as well.
For the lower eyelashes, the process is the same.


End Result.


