🔴This tutorial is a comprehensive guide on creating custom clothing for a character using Marvelous Designer. It covers various aspects, including modifying the default shirt and pants, adjusting sleeves, adding straps, and creating unique designs.
🔴The tutorial also demonstrates how to achieve different clothing styles and properly simulate them on the character's body. Additionally, it shows how to tuck in the shirt and make further refinements for a polished look.
🔴Overall, this tutorial provides a step-by-step walkthrough for users to create and customize clothing in Marvelous Designer.
- Workflow
In this tutorial, we’ll be creating a pair of shirts and pants for the character made previously.
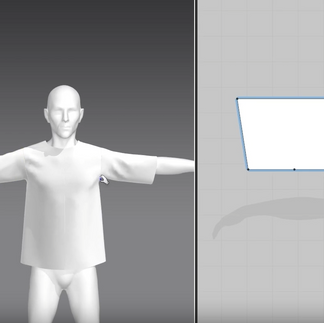
We start by adding the basic shirt from Marmoset and rotating the sleeves to fit the T-pose of the character.
We then remove the curves on the top of the sleeves and make the sleeves longer.
Rotate the sleeves so that they simulate better on the character.
You’ll still have to fix some parts while the simulation is running.


Move the points of the pattern to create a tapered shape for the sleeve.
If the sleeve is too long, we can always adjust it at any point, and lift up the edges below the sleeves to shorten them.
With Internal Polygon/Line (G), we’ll create an angeled cut in front of the shirt to make an opening.
With Edit Curvature (C), curve the edge, then cut and sow the edges from the front pattern and delete them.


If the opening is too big, select the edges on one side, and move them inward to make the opening smaller.
We’ll create a rectangle pattern in the 2D Window, and place it near the sleeve in the 3D Window.
We want a thing short rectangle to wrap around the sleeve, before running the simulation, set the pattern to be on Layer 1 in the Property Editor.
Click on the Show Arrangement Points in the 3D Window, select the pattern then the points we want the rectangle to fold around, in this case, we want it to wrap around the middle of the arm.
After setting up the points, turn off Show Arrangement Points, sow the pattern together using the Sew tool (N), and run the simulation.


We want the band to fold tighter around the arm, to do that we just need to make the rectangle smaller in length by moving one of the edges closer.
After editing the pattern, run the simulation to see the results.
Make sure you Freeze the strap after you are satisfied with the results so that it doesn’t slip off during other simulations or lose the form you like.


This step will be a bit tricky to do.
Select the Tack tool from the 3D Window toolbar.
Add 2 or more tacks at the ends of the sleeve so that it doesn’t fold in weird ways when we move it.
If you want to remove a tack, select the Edit Tack tool from the same place.
To remove a tack, right-click on it with the Edit Tack tool, and press Delete to remove it.
When the tacks are added, run the simulation for them to stick the sleeve to itself.
Once we added the tacks, decrease the Particle Distance on the sleeve to 13 so that we have more topology to work with during this next step.
While holding the W key during a simulation, press at the end of the sleeve to add a Pin.
The Pin will hold the sleeve mid-air while the simulation is running and won’t fall down.
While this is happening, wrap the sleeve around the arm.
Copy and paste the strap from before, and place it on the other arm.


From the Gaments folder, add the pants to the project.
Adjust the size of the pants to fit the character.
Move the points at the crotch of the pants near the end so the pants have more room in the middle.


Lift up the ends of the pants, and create a tapered shape.
Select the same ends, right-click on them, and press the Offset as Internal Line to create a precise edge around 35mm.
Select the new edges, and cut and sow them.
When we run the simulation, the new patterns aren’t going to fit so well around the knees, and slightly tug upward.


To fix this, we can shrink the two patterns to get a better fold around the knees.
For the other sleeve, we’re going to add the same type of strap we used for the arms.
Split the edges on that sleeve, and lift up the new points to make a wavy shape.
Since this character is from a wild tribe, we don’t want the clothes to look so perfect and well-made.
Going back to the top, make the ends more curved so they don’t stick out so much.
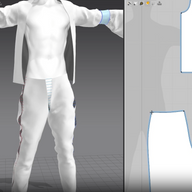
Lastly, we want to tuck the shirt inside the pants.


Creating Stitches
The beginning of this tutorial is a short demonstration of how you can add stitching to the clothes in Marvelous Designer.
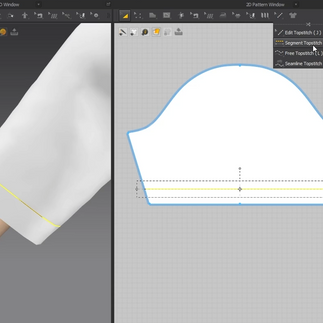
On the sleeve pattern, draw out an edge, and select it, in the 2D Window toolbar, there is a stitch icon, press the icon and select the Segment Topstitch (K).
With this tool, click on the edge to add the stitching around it.
Next to the Fabric outliner, open the drop-down menu and change to the Topstitch outliner.
Select the layer to change the Specifications of the stitching.
We can change the shape, length of the stitching, the space in which they are separated, and the thickness of the thread.


We can also add stitching around the neckline.
Select the edge, right-click it, and press the Offset as Internal Line.
Insert a value for the distance between the edges then press OK.
We can add a new type of stitching by clicking the Add button.
For the new stitches, we can use a different shape around the neckline.