🟡In this tutorial, we dive deep into the process of creating master materials and material instances in Unreal Engine.
🟡We explore how to set up parameters for controlling base color, normal maps, ambient occlusion, roughness, metallic, and even emissive maps.
🟡Learn how to make your materials dynamic and adaptable, perfect for game development.
- Workflow
Just like in the previous tutorial, we’re going to make an Asset folder, and inside import the Spiderbot OBJ file.
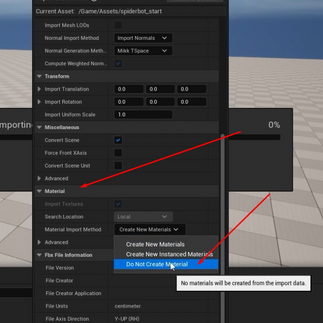
In the Advanced options, turn off Remove Degenerates, and turn on Combine Meshes.
In the Material options, change the Material Import Method to Do Not Create Material, and turn off Import Textures.
After everything is set up, click the Import All button.


Darg and drop the Spiderbot in the scene and in the Content folder make a new folder, and rename it to Materials.
In the Materials folder, make two new folders one called Instances and the other, Textures.
In the Textures folder, drag and drop the Spiderbot textures.
Make sure the save the progress from the content browser on the Save All button.


In the Materials folder, right-click on the empty space, and click the Create Material icon.
Name the new material M_MasterMat.
Double-click on the material to open the material graph.
Right-click in the material graph and add the TextureSamplePerameter2D.
With this node, we will make placeholders for the texture maps.
Slowly through this tutorial, we’ll build up the Master Material to be more modular.
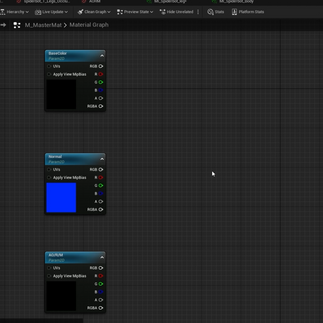
Once you make one TextureSample node, copy and paste it two more times.
Rename each TextureSample node to each texture map we need to add to make a material.
Click on the BaseColor node, in the Material Expression Texture Base option, click on the DefaultType drop down, and in the search bar look for a Black Texture.
Click the black texture to be a placeholder for the base color.
For the Normal node, in the same options search for the T_Normal Texture.
This is a default normal texture inside of the Unreal Project.


For the AORM node, it will require some extra steps.
Make sure that every AORM texture map has the sRGB turned off.
For the AORM node, add the same Black Texture as we did for the Base Color but this time, click the search folder icon below the drop-down menu.
Copy and paste the black texture and rename it AORM.
In this copy, open it and turn off the sRGB.
Open the Material again and change the texture on the AORM node to the AORM we made from the black texture.


Connect the nodes to the Material graph, and save the changes.
Exit the material graph, right-click the Master Material, and click the Create Material Instance.
Make two of these Material Instances, and name one MI_Spiderbot_Body and MI_Spiderbot_Legs.
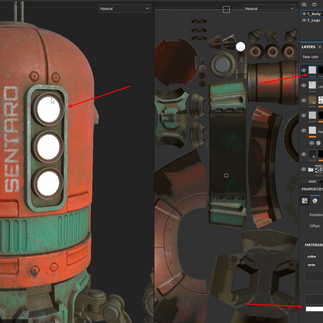
Open the Material Instance for the Body, turn on the placeholders for the textures, and drag and drop the texture maps for the body in each box.
Do the same thing for the Material Instance for the Legs.
Save the changes before dropping the Material Instances on the Spiderbor.
For now, they behave like any normal material, but we can add more options to the Material Instances by changing the Master Material.


In the material graph for the Master Material, turn off the connections of the nodes by holding down Alt and clicking on the string.
Hold down M and click on the material graph to add a Multiply node.
Hold down S and click on the material graph to add a Perameter node.
Rename the parameter to BaseColor Intensity, and in the Details options on the left side, set the Default Value to 1.
Connect the multiply node with the BaseColor and parameter, then connect it to the Material node.
Save the changes, and go into any of the Material Instances where you will find a BaseColor Intensity option.
Increasing the value will make the base color brighter while decreasing it will make it darker.


Back in the Master Material graph, add another Multiply node.
Hold down V and click on the material graph to add a Vector Parameter, name the vector parameter BaseColor Overlay, and change the color to white.
Connect the vector parameter to the multiply node, and the second multiply node to the first one.
Add a Desaturation node by right-clicking anywhere in the graph and searching up the node.
Add another parameter, rename it to Saturation, and set the value to 1.
Add a 1- node by right-clicking anywhere in the graph, and searching up the node name by typing in 1-.
Connect the Saturation node to the 1-.
Connect the 1- to the Desaturation node, before connecting it to the Material node.
Drag-select all the nodes for the base color, and click C to add a comment.
When moving the comment box, it will move every node inside of it.
You can rename the comment by clicking F2.
Set up the Normal node.
Add a Multiply node and a Parameter, rename the parameter to Normal Intensity, and set the Default Value to 1.
Connect the Normal Intensity to the Multiply node, and the Multiply node to the Normal node.
Add a FlattenNormal node, and connect it to the multiply node.
Add a parameter, and rename it to Normal Flatness with a Default Value of 1.
Add a 1- node, connect it to the Normal Flatness, and then connect it to the FlattenNormal before connecting it with the material node.


For the AORM map, add 3 Multiply nodes and 3 parameter nodes.
Clicking twice on the thread will make a redirector that can be used to organize the threads so it is more visibly clean.
Right-click on the Specular in the material node, and click the Promote to Parameter button.
Move the Specular node down to the rest of the nodes for the AORM map.
Set the Default Value from the Specular node to 1.
Connect each multiply node to the material node like we usually do with texture maps.
Add a comment to organize the graph.
When we open any of the Material Instances, there will be a lot of options that give us better control over the texture maps.


To make the Material Instances more organized, open the Master Material graph, and select the BaseColor Intensity, BaseColor Overlay, and Saturation node.
In the Details on the left side, click on the Group name to change it to BaseColor.
Select the Normal Intensity, and Normal Flatness, and change the Group name to Normal.
Select the Specular, AO Intensity, Roughness Intensity, and Metallic Intensity, and change the Group name to AORM.
Select the AORM, Normal, and Base Color Map, and rename the Group to Textures.
Save the changes and open the Material Instance to see the change.


Make an Emissive map on the Spiderbot inside the Spiderbot, and export the texture.
Put the texture inside the Unreal Project with the rest of the texture maps.
In the Master Material, add a new TextureSamplePerameter2D, and rename it to Emissive.
Change the color of the Emissive node to white.
Add a Vector Parameter and connect it with the Emissive node through a Multiply node.
Add a parameter, and rename it Emissive Intensity with a Default value of 1.
Connect the Emissive Intensity through a new multiply node that is also connected to the first multiply node.
Connect the Emissive to the material node and save the changes.
Select the Emissive Color and Emissive Intensity, and rename the Group to Emissive.
Save the changes, and open any of the Material Instances to see the new features.