
In this ZBrush tutorial, learn how to use curve brushes to create custom shapes and designs on a base mesh.
The instructor demonstrates various curve brushes and shows how to manipulate curves to make belts and tentacle-like shapes.
Discover the process of creating custom insert meshes for curve brushes and the techniques to control and modify curves.
- Workflow
Open up the Male Base mesh inside of the ZBrush project.
Curves won’t work if you have divisions on the mesh.
To know which brushes are curve brushes, click BC on your keyboard and all the brushes starting with “Curve” are curve brushes.
Curve brushes work differently than the brushes we’ve worked with in previous classes.
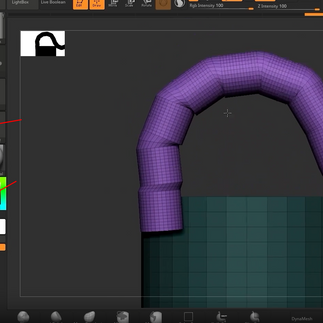
Select the CurveMultiTube brush, when we make a short brush stroke down the mesh a red line will appear and after letting go of the stroke, a tube will appear on top of the red line.
The red line is how we control the curve.
If we pull on the curve from the bottom, the tube will start to bend.
But, if we try to move the top point of the curve, it will move the entire tube without bending it.


If we increase the red brush size and click on the curve, the tube will get larger.
Making the red brush smaller will shrink the tube in size.
We can also switch curve types by selecting a different curve brush and click on the already placed curve.


We can make changes to the curve brush and how it behaves inside the Stroke tab.
Open up the tab and click the little plus button on the side to dock the tab in our workspace.
If your curve is too short, you can continue the curve line and make it longer.
To do this, place the cursor near the end or start of the curve line till a red line snaps to the cursor.
When this happens, continue the line as much as you want.


In the Stroke options, there are the Curve settings.
If the Curve Mode is on, the brush will have a curve line and turn the brush into a curve brush.
The Bend End makes it so you can bend and curve the top point of the curve
The Lock Start keeps the bottom of the curve from moving the entire curve line when it’s bending.
If Lock Start is turned off, when we move the end of the curve it will also move the start point.
Lock End is the same thing as Lock Start but for the endpoint of the curve.


We can also make curves on our mesh without using curve brushes but the Slice Curve tool.
Slice the model in half to split that area into 2 polygroups.
In the Stroke options, open the Curve Functions.
Here turn off the Border and Creased edges, and only have the Polygroups on.
After that click on the Frame Mesh button.
A curve line will appear in the middle of the two polygroups.


Use the CurveFlarSnap brush and click on the curve.
In the subtool, Split the curve from the mesh by clicking on the Split Masked Points.
Use Dynamic Subdiv to add thickness to the plane and move it out of the mesh with the Move brush.
We can make pelts, ropes, and other accessories on characters or props by using this method.


Making custom Curve Brushes
We can also make our own curve brushes to make our workflow faster.
We’re going to make the tentacles from Doc Oc from the Spiderman Comics.
We’ll start off with a cylinder, squish it and make a duplicate of it, and hide one of them so it doesn’t interfere while we work.


Use the Knife Curve to make a slice in the middle and on the side of the cylinder.
Mask the top and reverse the masking.
With the Gizmo tool move up the exposed parts of the mesh and squish them from the Z and X axis.
After you’re done DynaMesh the model on a high resolution.


Un-hide the other cylinder and squish the shape more and make it longer.
Merge the two parts together and DynaMesh them.
We can see that we have extra polygroups because of the cuts, to only have one polygroup click Ctrl + W to assign a new polygroup on the mesh.


Rotate the mesh, open the Brush menu, and click on the Create InsertMesh, a new window will show up, and click on New.
Now we’ll have a brush from or mesh.
To turn it into a curve brush, in the Stroke menu in the Curve settings click on the Curve Mode button to activate the curve function.


Go back to the male base mesh and add in the tentacles on his back.
Disable the Snap function in the Curve settings so the curve lines don’t snap to the mesh and can be moved inside the mesh itself.
The CurveStep makes the meshes more inside each other to create a smoother curve.
If you don’t want the start to move click on the Lock Start.
If you want to remove the curve lines, go inside Curve Functions and click on the Delete button.


End Result.

Bonus - Making your custom curves better
In a new project append a cylinder, mask the top and bottom parts of the cylinder and assign them a new polygroup with Ctrl + W.
Isolate the front part of the cylinder with Ctrl + Shift and click on it.
Go into Geometry, Modify Topology, and click Del Hidden.


Open the brush menu, click on the Create InsertMesh options then New.
Open the Stroke options, and activate the Curve Mode in the Curve settings.
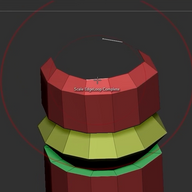
When we use the cruve brush the cylinders don’t connect with each other.
We can fix this problem inside the Brush tab.
Open it up and dock it to the side of the workspace by clicking on the plus button on the side of the tab.


Open the Modifiers setting and enable Weild Points.
The cylinders are now together but the transition isn’t smooth.
To fix this, click on the Stretch option and increase the Curve Res to a bigger value.
After the changes, we can see we have a smooth result from our custom curve brush.


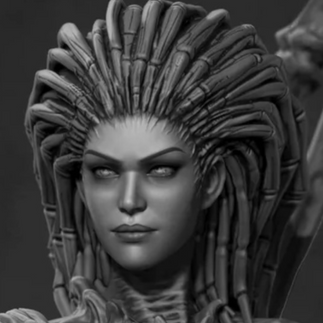
Making the hair of Kerrigan From Starcraft
Make a new project and append a cylinder.
Elongate it, add a sphere, and shape the sphere with the move tool to be the shape of a fang.
Merge the cylinder and the sphere together and DynMesh them on a high resolution.


Zremesh them once on Adapt then on Half multiple times until the topology is as low as in the image provided below.
We need it to have low topology so we can use the ZModeler brush to make the gaps in the hair.
Activate the ZModeler brush (BZM) and hover an edge to open the edge actions menu, select the Insert action, and set the target to a Single EdgeLoop.
Insert a new edge above where the curve starts to form.
Hover over a polygon to open the polygon actions, select the QMesh action, and set the Target to Polyloop.
Extrude the lower faces of the edge loop we added.


Hover over an edge and select the Bevel action still on Single EdgeLoop target.
Bevel the top and bottom of where we made the extrusion.
Switch to the Scale Edge Action with EdgeLoop Complete target.
Switch to the Inster Edge Action and add an edge in the middle of the extrusion.
Grap the edge loop in the middle of the extruded polygroup and drag it outwards.


Mask the top of the mesh and assign it a new polygroup.
Select the new polygroup with Ctrl + Shift to isolate it, then while still holding Ctrl and Shift drag on the side to reveal the rest of the object and hide the top polygroup.
Once it is hidden go to Geometry, Modify Topology and click on Del Hidden.


Make an extrude on the top of the mesh with QMesh and target set on Polyloop.
Select the Inster Edge action and insert a new edge loop in the middle of the extrusion.
Select the Scale Edge action and scale out the middle edge.
We want to straighten the top of the mesh, to do that use the Scale Edge action, grab the top edge loop and drag outwards.
After that click Ctrl + W to turn the entire mesh into one polygroup.


Mask the top faces of the mesh and give them their own polygroup, afterward to the same to the curved tip on the bottom.
We’re doing this so that only the polygroup in the middle gets repeated and not the whole thing when we turn it into a curve brush.
Open up the brush menu, and click on the Create InsertMesh button.
In the Stroke tab, open the Curve settings and click on the Create Curve button.
In the Brush tab open up the Modfiers settings, check the Wel Points option, and increase the Curve res.
When we use this curve brush it will give us a hair strand of Kerrigan from Starcraft.
Add divisions to the hair to make it less blocky.


End Result.


