
🟥Learn how to create an isometric blockout of a tavern room in this Autodesk Maya class, including furniture and attractions like a bar and stage.
🟥Get ready to build a tavern with various attractions, like a bar, stage, booths, and instruments.
🟥Follow along to understand the blockout process and prepare for the next modeling phase.
- Workflow
To create the floor of the room start off with a cube and change the Subdivisions to 10x10 to have equal sides.
Move the pivot to one of the corners by holding D + V and use the Move tool to move the pivot.
Use Ctrl + D to duplicate the floor and Snap it above the first cube by moving it and holding down V.
Do this one more time, this time snapping the other cube on the opposite side.
The floor should look like a heart shape.


Duplicate one of the cubes used for the floor and rotate it 90 degrees by using the rotate tool and holding down J.
Scale down the wall a bit so it isn’t the same size as the floor in length.
Make sure the wall is snapped to the floor.
Duplicate the first wall and make the rest of them all around except for the front.
When making an Isometric room, we don’t want to cover the room with walls all around so that we can see inside the room when it’s displayed.


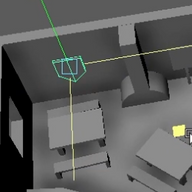
Before we start blocking out we need to set up our camera shot.
Click the Panels tab, Perspective, and select the New option.
A new perspective camera will appear in your outliner, double click the camera and change the name to Isometric.
Press Space to open up all 4 views and on the Top View, change the camera to the Isometric one by going inside the Panels tab, Perspective, and clicking the Isometric camera.
Make sure that you have the Perspective camera where we’ll be working on the room.
On the upper right corner where your perspective view is you may notice the name below says Isometric.
To change to the Perspective camera, go into Panel, Perspective, and click the persp camera.


Click the Isometric camera in the Outliner, go into the Attribute Editor, and make sure you have the Isometric Shape menu open.
From here scroll down until you find the Orthographic Views option and tick it.
This will turn the camera into an Orthographic view.
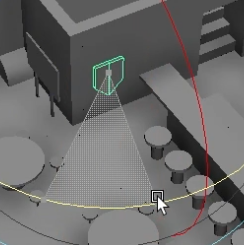
Activate the Field chart and place the camera where the center line splits the room in half.


Open the ZooToolsPro options and open the Camera Manager.
Set the scene resolution to 2048x2048.
Change the Fit Mode to Overscan.
And lastly, tick the Match Res/Film Gate and Display Resolution Gate.
One last time check if the Frame grid is nicely aligned with the room.
Now that our shot is set up we can move on to blocking out the room in the perspective view.


Add a cube and scale it to the size and length of a bar table.
For the barrels, we’re going to use cylinders that have been rotated 9 degrees and stacked behind the bar on top of each other.
With the multi-cut tool add an edge near the barrels and bevel it with 1 Segment and increase the fraction to 0.3
Add another edge on top to create a doorway.
Delete the faces and bridge the holes on the inside of the doorway.


Duplicate a wall and snap it on the side where the doorway wall is.
With the scale tool scale it down so that the wall isn’t visible in the Isometric camera.
To hide the top part of the wall, elect the end edge and move it down to a slope and it will be hidden in the Isometric view.


Add a cube and place it in the gap at the doorway.
Scale it to be the same size and length as the gap.
Make sure you place the pivot on the upper right vertex to better snap it in the gap.
Once you filled the gap, duplicate the cube with Ctrl + D, hold V, and snap it to the top of the first cube, after that click Shift + D 3 more times to create a staircase with the duplicates.
Name all of the objects we’ve added so far into the scene and group them up to keep the Outliner organized.


Add another cylinder and rotate it 90 degrees then place it on the wall behind the bar next to the barrels.
On the bar use the multi-cut tool to make a couple of cuts to create a door that can be lifted up to enter behind the bar.
Add the cuts and delete the faces you don’t need and fill any holes that have been made
On the inside of the bar, select the face below the multi-cut and extrude it out to create a working station for the bartender.


Add cubes and scale them down to the size of a crate and stack them on top of each other and place them anywhere you want in your room.
With another cube create the liquor cabinet behind the bar.
Add a cylinder and scale it down to be the size of a chair, select the faces below, extrude them inward then extrude them down to create a bar stool.
Place the chair at the bar and make duplicates of it.


Add another cylinder, add a multi-cut on the top, select the faces around the multi-cut, and extrude them out to create a table.
Duplicate the table and place it around the tavern in front of the bar.


Add a cube to create the other tables so we can have a bit more variety in the scene.
Scale it down to be the size of a table and add 3 multi-cuts in the middle by holding down Ctrl and clicking with the Middle Mouse button.
Delete the edge loop in the middle and bevel the other two.
Add 5 multi-cuts again in the opposite direction, delete the 3 in the middle, and bevel the other two.
Select the square faces below and extrude them to create the legs for the table.
Duplicate the table and place it on the other side of the room.


Add a cylinder, rotate it 9 degrees, and delete half of it.
Place it near the wall, select the two faces on the top, and extrude them outward to create the fireplace.
While still having the two faces selected use the scale tool to straighten the top of the chimney.


Add another cylinder to create a stage in the corner of the room.
Delete most of the faces, place the stage in the left corner, and scale it on all three axis.
Close the hole on the side that is visible from the Isometric camera.


Make a hole in the wall for a window near the stage the same way we did for the doorway.
Use the multi-cut tool to add edges around, delete the face in the middle and close up the holes on the side of the window opening.
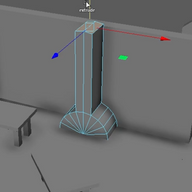
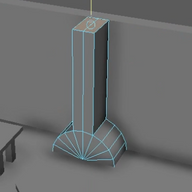
With cubes make a small staircase at the front of the tavern.


With another cube make an arm wrestling table.
Add a multi-cut near the top, select the faces in the middle, and extrude them inward using the scale tool.
Place the table anywhere in the tavern.


We can make a board for the tavern.
Start with a cube and shape it into a quest board.
Add three multi-cuts using Ctrl + MMB.
Delete the middle edge loop and bevel the other two.
Select the bottom faces and extrude them with Shift and the Move tool.


To make the rest of the chair, add a cylinder, add a multi-cut on the top, select all the faces below, and with the scale, tool extrude it in all three axis.
Duplicate the chair and add it to the other circular tables.


For the other tables, we’ll make a bench for them.
Add a cube and scale its length.
Add two multi-cuts on the side, select the bottom faces, and extrude them.
Copy the bench and add it to the other square tables.


To fill up the empty walls a bit more we can make banners out of cubes.
Scale and squish the cube, add a multi-cut in the middle then pull down the middle vertices to create the banner shape.
Scale the banner in width to make it wider and put them on the walls next to the fireplace and bar or wherever you want in your scene.


With a cube create a long sign that will be placed outside of the tavern.
The sign can be placed to be higher than the walls of the tavern.
Check the Isometric camera to see how it looks and from that, you can determine whether or not you like the position of the sign.


Add some cylinders on the stage for the drums.
To see if the scaling is correct in the room we’re going to make a simple character to determine the size of the objects.
Add a cube, scale it, add a multi-cut in the middle, select the bottom faces, and extrude them with the Keep Faces Together Off.
Select one face at a time below the feet to move them from side to side to split the legs.
Add two more multi-cuts, select the top two faces, and extrude them to create a head.


Place the character around the tavern and see which objects need to be adjusted.
In this case, we can see that our bar stools are too large and need to be scaled down.
After scaling down the chairs we can make some cups using cylinders.


In front of the tavern, we’ll make a small sign near the stairs with two cubes scaled and placed back to back with each other at an angle.
Duplicate one of the banners and place it outside.
Add a cube and create the handles for the banner.


End Result.


