
🟥The instructor starts with basic shapes and manipulates them to achieve the desired look.
🟥The instructor also includes tips on using tools like beveling and extruding to refine the models.
🟥The final step involves grouping and arranging the objects to create a scene.
- Workflow
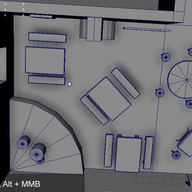
In this class, we’ll be going more in detail with the objects that we’ve placed in our isometric room during our block-out phase.
You can make the objects as simple or as detailed as you want.
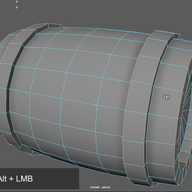
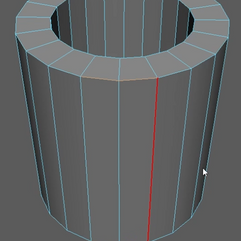
We’ll start off with the barrels, and isolate one of the barrels so we can work on it better.
Select the front and back faces, extrude them once inward on their offset and another time going inside the barrel itself.
Add a multi-cut in the middle and bevel it into multiple segments to create the shape of the barrel.


Select the first and last edge in the middle of the barrel and bevel them so we can add another edge next to them.
Select the face loop and extrude it to create the metals around the barrel that are keeping it together.


Select all the edges that are holding the form of the barrel and bevel them with 2 Segments.
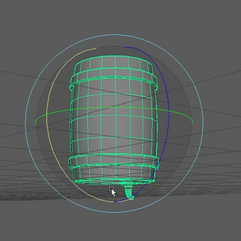
We want to keep the form of the barrel the way it is even in the Smooth Preview.
Select the faces on the front of the barrel and extrude them inward to create the tap of the barrel.
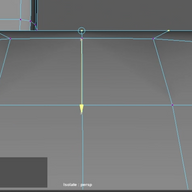
Move the extruded faces down using the move tool.


Extrude those same faces forward two times.
Rotate the faces 90 degrees and move them down.
Select the face loop in the middle and delete them.
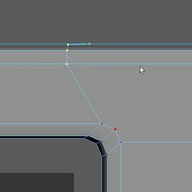
Select the two edge loops and bevel them with Blend turned on.
Add more divisions to the blend to create the curve and change the Direction Target se to +.


Select the faces below, extrude the offset, and extrude the faces again inward.
Select all the edges on the tap and Soften them.


Add a multi-cut in the middle of the tap and bevel it with 2 Segments.
Select the second edge of the row and bevel that one again with 2 Segments.
Select the 4 face loops and extrude them outward.


Select the 4 middle faces of the extrusion and circulate them.
Use the Twist to move the circle in place so it isn’t crooked.
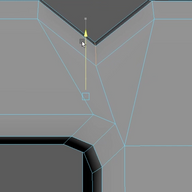
From the side select the three faces in the middle of the circle and lift them up using the snapping method by holding down V and using the move tool.


Extrude the circular faces outward and flatten the surface by using the scale tool.
Select the outside edge and bevel them.
Add a multi-cut on the bottom and select two faces from each side to extrude.


Flatten the side faces by selecting the edge in the middle from each side and using the scale tool to flatten them inward.
Select the faces, and with the scale tool shrink them in width.
Select the edges on the tap, deselect the ones on the side, and smooth out the edges.


Now that we are done with our barrel we can replace the blockout cylinders with the modeled barrel we’ve just made.
We can add a cube below the barrels so that there is something to hold onto them and prevent them from rolling and moving around.
Add a cube, scale it in length, and place it below the barrels.
Duplicate the cube and place it in the front and back.
We can also replace the big cylinder on the wall with our modeled barrel.
We don’t want anything sticking out of the walls so we can delete half of the faces of the barrel and only have the front part with the tap visible.


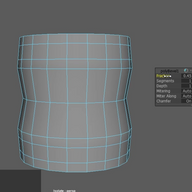
For the cabinet behind the bar, add two multi-cuts, select the edge loops and bevel them.
Select the edges all around the cabinet and bevel them with 2 Segments.


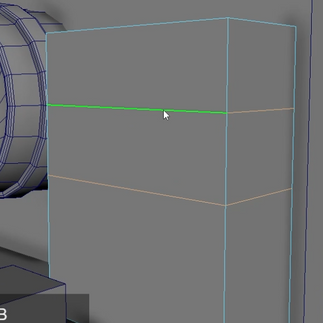


Select the two top faces and extrude them inward.
Add a multi-cut in the middle of the cabinet and bevel it.
Lower the Fraction by a lot and add another two multi-cuts below and on the top of the lower part of the cabinet.
Select the faces we made with the multi-cut and extrude them inward.


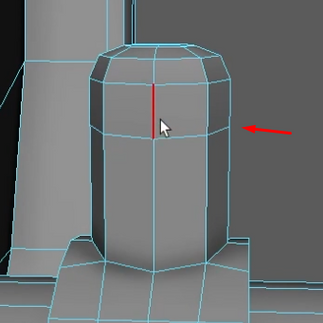
We can make some bottles or cups to decorate the cabinet.
Add a cylinder and bevel the bottom faces and smooth out the middle edge of the bevel.
Select the top faces and extrude them out, and scale down the same faces to create a taper shape.
Keep extruding and scaling down the faces till you make the neck of the bottle.
Once the neck is done, select all the edges from the bottle except the bottom and top ones and smooth the edges.


Select the top faces and duplicate them.
Move up the duplicate faces so they’re not in the way.
Select the top faces again of the bottle and delete them.
Select all the faces of the bottle and extrude them inward.
To flip the faces back to normal, select the bottle in Object Mode, open up the Mesh Display tab, and click on the Reverse option.


Add a Blinn material to the bottle and in the Attribute Editor lower the Transparency on the blinn material on the bottle.


Duplicate the bottle and give the duplicate a lambert material.
Select the neck of the duplicate bottle and delete them.
Close the hole in the duplicate by selecting the edge loop on the hole, extruding it slightly inward, and then Merge the Edge to the Center.
Select the top edge loop and soften the edge.
Change the color of the lambert for the duplicate to a blue color or any other color of your choosing.


For the faces we’ve left above the bottle, select the edgel oops at the end and extrude them downward, scaling the end down to create a taper shape.
Close the hole on the bottom of the cork by extruding the edge loop inward and Merging the Edge to the Center.
Select the top and bottom edges and bevel them.
After we’re done with the cork lower it down inside the neck of the bottle.


Add a multi-cut in the middle and bevel it with 2 Segments.
Select the edge loop in the middle and scale it out.
Select the same edge and bevel it once more with 2 Segments.
Select the middle edge and Soften it.


Select everything on the bottle and combine it.
Duplicate the bottle and place it inside the cabinet.


We can make the crate longer, if you want to leave them as perfect squares that is also ok.
Select the faces and extrude the offset with the Keep Faces Together Off.
Extrude the faces again this time inward.
Select the outer edges and bevel them with 2 Segments.
Replace the cubes from the block out with the new crates.


Select the outside edges of the bar and bevel them with 2 Segments.
Move the top vertices of the edge on the side and add two new edge loops with multi-cut.
Reconnect the topology with the multi-cut tool on both sides of the bar.


Add a cube and make the second half of the bar.
Select the outer edges and bevel it with 2 Segments.
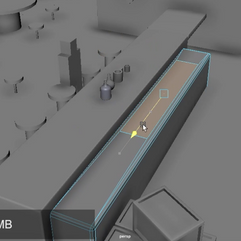
Select the top face and extrude the offset inward.
Scale down the face in length and move it to the side.
Extrude the face downward and with the scale tool squish the face inside the sink on the sides.


Moving on to the chairs, delete the faces on the bottom of the chair and close up the hole.
Select the top and bottom edge loops and bevel them with 2 Segments.
Add a cube to start creating the legs for the chair.
Delete the top and bottom faces of the leg.
Select all the edges except for the top and bottom edges around the holes and bevel them with 2 Segments.
Add two multi-cuts in the middle, select the top vertices with Soft Select on, and from the top view with Wire Frame on, move the top vertices at an angle near the center of the chair.
Select the two edge loops we added and bevel them with 2 Segments.
Mirror the leg to the other side to create the rest of the legs.


Select all the legs and combine them.
Select the 2 opposite faces on the bottom of the chair and use the Bridge Faces tool.
Do the same to the other legs on the opposite side.
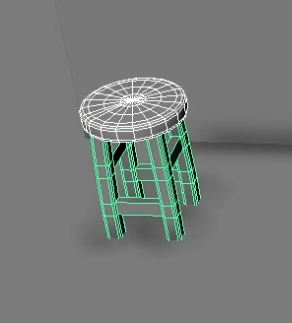
Group up the legs and the top of the chair and make duplicates to fill the bar with.


We’re going to create a tankard out of one of the cups we made in the block-out.
If you don’t have this cup, add a cylinder, scale it down to the size of a cup, select the top faces, extrude the faces in their offset, and extrude them again downward.
For those who have the block-out of the cup, delete the extruded faces and close up the hole by selecting the two top and bottom edges and bridging them together.
Continuing for both cases, add 3 multi-cuts in the middle of the cylinder.
Select the edge loops leaving out the middle one and scale them out.
Select the middle edge loop and scale it inward to create the shape of the tankard.


Add two more multi-cuts on the top and bottom of the cylinder.
Select the sane edge loops and bevel them.
Select the face loop and extrude them outward to create the metal wrapping around the tankard.


Select two faces from the top and bottom metal and bridge the faces together.
In the bridge menu change the Curve Type to Blen and set the Direction Source and Target to +.
Add as many Divisions as you need to make the handle of the tankard curve.
Select the outside edges of the tankard and bevel them with 2 Segments.
Select the faces inside the tankard, turn on Wire Frame mode, and bring the selected faces lower inside the tankard before beveling them with 2 Segments.
As a last touch, you can select some of the vertices on the handle with Soft Select and squish that part of the handle to give it a curve on the sides.


For the other cup we made in the block out, we can select the bottom edge loop and bevel it with 5 Segments.
Select the edge loops on the top and inside of the cup and bevel them with 2 Segments.
Select the inside faces of the cup and push them down like we did on the tankard and scale them out a bit to make the bottom wider than the top.


Select the top vertices, move them down, and scale them in a bit more.
Add an edge loop in the middle with the multi-cut tool, select the same edge loop, and scale it out to make the bottom of the cup even wider.
Place these cups anywhere in the room.


To make plates add in a cylinder and scale it down to make a thin disk.
Select the top faces and extrude in the offset then move those same faces down a bit.
Select the outer edges and bevel them with 2 Segments.


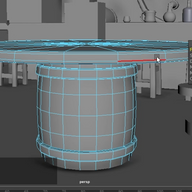
Moving on to the circular tables, duplicate one of the barrels and rotate it for another 90 degrees where the tap is facing the ground.
Delete the bottom faces and the top faces of the barrel.
Delete the faces below on the block-out table.
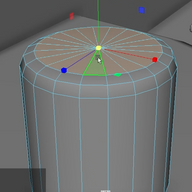
Select the top edge loop of the barrel and extrude it upward.
Close the hole on the top by extruding the offset of the edge loop, and then Merging the Edge to the Center.
Select the face loop around the top of the barrel and extrude it out to create the top of our modeled table.
Delete the rest of the block-out table.


Select the outer edge loops on the top of the table and bevel them with 2 Segments.
From the top delete every second edge.
Replace the other circular tables with the new ones.


Select one of the chairs near the circular table.
Delete the leg of the chair and close up the hole.
Select the top and bottom edge loops and bevel them with 2 Segments.
Add a cube to create new legs for the chair.
Delete the top and bottom faces of the cube.
Select the edges around the cube, ignoring the top and bottom edges, and bevel them with 2 Segments and a bigger Fraction.
Select the edges around the cube and Smooth them.


Select the top vertices of the cube.
From the top view and with Wire Frame turned on, move the top vertices toward the center of the chair and scale them to make a taper shape for the legs.
Duplicate the leg and put 2 more of them on the chair.
Select the legs and the top of the chair and combine them.
Replace the chairs around the circular tables with the new ones.


For the square table, you can start off with a brand new cube or delete the legs of the table, close up the holes, and delete any extra edges.
Select all of the edges and bevel them with 2 Segments.
Add a cube to make the legs of the table.
Delete the top and bottom faces, select the edges around the cube, bevel them with 2 Segments and a bigger fraction then smooth out those same edges.
Duplicate the leg to make the rest of them for the table.
After everything is done select the legs and table and combine them.


For the bench, you can also start with a new cube or fix the one from the block out by deleting the faces for the legs, closing up the holes, and deleting any extra edges.
Select all the edges and bevel them with 2 Segments.


Add a cube to make the legs for the bench.
Scale it and squish it in width.
Delete the top faces of the cube.
Select the top vertices and scale them down to create a taper shape for the leg.
Add a multi-cut in the middle, select the new edge loop, and bevel it.
Add another multi-cut on the bottom.
Select the faces below in the middle of the leg and delete them
Close up the coles using the Bridge edges tool.
Duplicate the leg and place it on the opposite side.
Combine the leg and the rest of the bench.
Replace the square tables and benches from the block out to the newly modeled ones.


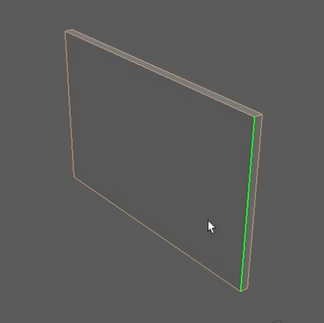
The banners are pretty simple.
Select all the edges and bevel them with 2 Segments.
Squish them with the scale tool so they’re not too big and place them on the wall.
Replace all the banners on the project with the newly modeled ones.


Delete the legs of the quest board and close up the holes.
Delete any extra edges, select the remaining edges, and bevel them with 2 Segments.
Select the front face of the board, extrude the offset then extrude the face again inside the board itself.


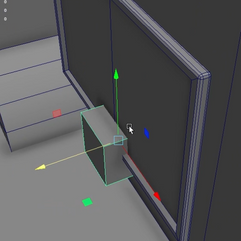
Add a multi-cut in the middle to help with the snaping of the cube in the middle of the board.
Add a cube and snap it to the edge by holding V and using the Move tool.
Delete the edge in the middle of the board after the cube has been snapped.
Make the cube longer and thinner.
Delete only the top face of the cube.


Add a multi-cut on the bottom of the cube.
Select the face loop and extrude it outward.
With the scale tool adjust the size of the extrude.
Select the outside edges of the cube and bevel them with 2 Segments.
Combine the leg and the rest of the board.
Add planes with 1x1 Subdivisions and place them on the board.


Select the front faces of the fireplace and extrude the offset.
Extrude the same faces again this time inside the fireplace.
Select all the outside edges around the fireplace and bevel them with 2 Segments.


Delete every second edge inside the fireplace.
Select the top faces of the chimney and extrude them downward.
As a last touch add in a cylinder and scale its length.
Delete every second edge on the top and bottom faces.
Select the top and bottom edge loops and bevel them with 2 Segments.
Place the cylinder inside the fireplace to act as logs and make as many duplicates as you can fit inside.


Select the top edge loop of the stage and bevel it with 2 Segments.
Fix the topology on the side of the stage using the multi-cut tool.
Select the edge loop in the middle and Soften it.


For the drums, use one of the cylinders to model the new drum.
Select the top edge loop and bevel it with 2 Segments.
Select the top faces and extrude the offset two times.


Select the middle edge loop on the top of the drum and move it down.
Select the ring of edges on the inside of the gap and Soften them.
Select the top edge loops of the drum above the gap and bevel them with 2 Segments.
Select the middle edge loop on the outside of the drum and Soften it.
Delete the bottom faces of the drum and replace the other drums from the block out.


For the sign outside we can add a text by holding down Shift and right-click then selecting the Type option from the menu.
In the Attribute Editor select the type1 and here we can write anything we want and change the font and spacing of the text.
Type anything you want for the sign outside.
Just like any object we can scale and move it with the given tools.


For the small signs outside, select all the edges of the small sign and bevel them with 2 Segments.
Select the top vertices and scale them from the side to create a taper shape.
With the Type tool write anything you want for the small sign.
Lastly, select all the edges from the banner sign outside, bevel them with 2 Segments, and use the Type tool to type anything for it.
So our banner doesn’t float in the air, add a cylinder and change the Subdivisions to 8, delete the top and bottom faces, and place them between the banner and the frame.


End Result.


