🔴Learn the fundamentals of animation in Maya with this introductory video tutorial.
🔴Explore the Maya interface, keyframing, timing, spacing, and the use of the graph editor to create a bouncing ball animation.
- Workflow
In previous tutorials, we’ve seen the basics of animating in Autodesk Maya.
To go over the basics, below the workplace, we have the TimeLine, where we can place keyframes to animate objects or characters.
Next to the TimeLine is the Play and Pause buttons.
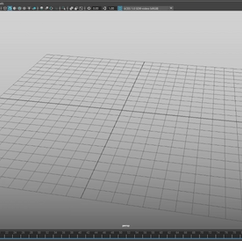
When animating, make sure the object is above the greed and the Translates are all set on 0.
Clicking on the Freeze Transformations icon will set all the Translates to 0.
Clicking on S will add a keyframe on the TimeLine on all of the Translates, if you want to only put a keyframe on one translate, right-click on the desired translate and click the Key Selected button.


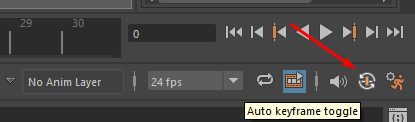
There is the Auto keyframe toggle that adds keyframes every time you move the object or joint if you’re working on a rigged model.
For example, if we move the sphere from its starting position and then press the Play button, there won’t be an animation because there was no keyframe added when we moved the sphere.
With the Auto keyframe toggle on, when we move the sphere, it will automatically add a keyframe there.
Using the shortcut Alt + V will autoplay the animation.


Right-clicking on the TimeLine will allow you to change from showing the frames to showing seconds by clicking the Timecode option.
Next to the TimeLine is an option where you can change how many frames per second the animation will be played in.
For movies, the standard is 24fps while for games is 30fps.
If you want to move a keyframe, select it, Shift + Middle Mouse Button, the keyframe will turn red with two arrows pointing back and forth, dragging the keyframe on any of the arrows will move it either back or forth on the TimeLine.


The Graph Editor is a useful tool used in 3D animation.
To turn it on, open the Windows tab, Animation Editors, then click the Graph Editor.
A new window will open up displaying two dots and a curved line.
The dots are the keyframes while the curve represents the movement of the object.
The color of the line is also important, red is for the X-axis, green is for the Y-axis and blue is for the Z-axis.
Because the ball is animated only on the Z translate, it will only show us one blue line.
If the ball had keyframes on every translate, there would be more colored lines in the graph editor.
You can also delete keyframes either by right-clicking a keyframe and pressing the Delete button, or directly from the Graph Editor by selecting the dot and clicking Delete on your keyboard.


The line in the graph represents how fast the ball will reach the next frame within seconds, the higher the line the faster the ball.
The next step is making a bouncing animation on the ball.
Delete all the frames so far and move to the end of the TimeLine.
Select the sphere, and right-click on the Translate Y to add a keyframe at the beginning.
On the 13th frame, lift up the ball and add another keyframe on the Y translate, if you have the Auto keyframe toggle on it will add a keyframe the moment the sphere is moved.
In the graph editor, select the first dot, Ctrl + C to copy, go to the 26th frame, and click Ctrl + V to paste the keyframe.
Now we only have a movement where the ball is going up and down and everything


Even though the sphere is going up and down it feels unnatural and robotic.
To make it look more natural we’ll need to make the in-between frames of each main frame.
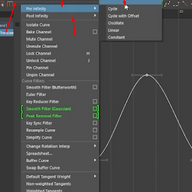
First, we can enable the Infinity inside the graph editor in the View tab.
After activating Infinity, in the Curves tab, turn on Pre and Post Infinity Cycle.
Now when playing the animation, it will constantly loop.
In the Graph Editor, add keyframes between where the ball is going up and down.
Right-click on the line and click Insert Key.
Select the two dots and move them up using the Middle Mouse Button, this way the dots will only go in the direction you’re pulling.
Now when the animation plays, there is a bit of a hold when the ball reaches the top and starts going down.


Another thing we need to fix is when the ball goes down after it reaches the top.
Because of how gravity works, the ball needs to come down faster, and therefore, when it goes down it needs to happen fast.
Each dot has its own tangent.
You can move the tangent to create interesting effects on the movement.
Moving one of the tangent lines upward will make it so the ball reaches that keyframe fast.


We can reach this another way without having to add more keyframes.
Delete the keyframes that were added between the main-frames.
Select all the frames from the Graph Editor and click on the Auto Tangent button to reset the tangents on each keyframe.
Select the top keyframe, right click and add Weighted Tangents.
Holding Shift + Middle Mouse Button will increase and decrease the scale of the tangent, making the top of the curve wider.
This means that there will be a hold on the top frame.
Select the tangents on the bottom frame, hold down Shift + Middle Mouse Button, and bring them together to a point.
If there is a point at the end of a keyframe in the Graph Editor, that means that the movement will happen faster.
The animation will look the same as it did with the two extra keyframes on top.


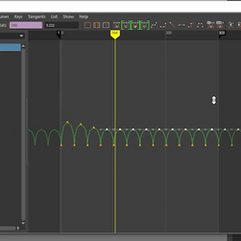
In the next example, we’ll make a ball that bounces until it stops.
To do that, copy and paste the keyframes that are already placed in the graph a couple of times.
Grab the top dots and bring them upwards, then select a few of the top dots and bring them down until the lines on the graph look like they are gradually going down.
If the ball is moving too slowly, move the frames closer to each other by selecting the dots from the graph and moving them close with each group selection.
Lastly, we want to add some weight at the end when the ball slows down, to do that we need to stretch the tangent on the dots until we have a circular curve.
If the last frames are too far apart, move them closer to each other from the graph editor.