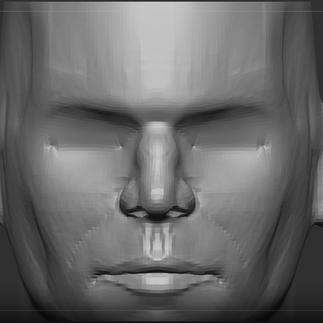
🟠Learn to sculpt a male face in ZBrush with this comprehensive tutorial.
Master various techniques to create realistic facial features using ZBrush brushes.
🟠Learn the process of creating a realistic face through digital sculpting techniques, focusing on eyes, eyelids, nose, and expressions.
- Workflow
Just like in one of our previous classes, we’ll be using the male Head Plane from inside ZBrush as a starting point for today’s class
Click on the LightBox, go inside Projects, double-click on the Head Planes folder, and choose the HeadPlanes_Male_128.ZPR.
DynaMesh the head on a high resolution and use the Flatten and Smooth brush to smooth out the head from all sides.
Just like always when we have a symmetrical character use the symmetry when working by pressing X on your keyboard.


Starting off with the nose, the beginning of the nose is more pinched than the end, use the Move Topolgy brush (BMT) to pinch the beginning of the nose.
With DamStandard carve out the side of the nose.
With ClayBuild up add more volume on the sides of the nostrils.
With the Move Topology brush grab the tip of the nose with a small brush size and slightly move it outward to make it more round at the end.
Add more volume on the tip of the nose with ClayBuild up.
DynaMesh the head on a medium resolution.


Using the Move Topology brush again, pinch the side of the nose that is almost at the tip.
We do this because there is still some bone at the beginning of the nose but afterwards there isn’t.
This is why the first couple of inches from the beginning of the nose will be a bit wider than the rest.
With ClayBuild + Alt up take away some of the clay on the sides of the nose.


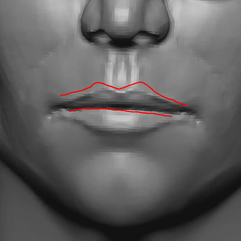
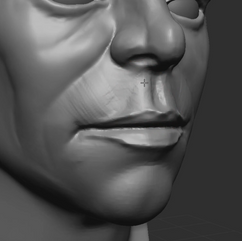
With DamStandard + Alt draw out the mouth starting with a horizontal line below the nose then from there draw out the top and bottom lip.
With the Move brush adjust the outlines to form a more natural shape for the mouth.
Mask the bottom part of the face so that we can more easily shape the top lip.
Use the Move Topology brush to shape the lip, bringing it out from the side and most importantly from the top view.


We can check if our top lip is out enough by drawing a line from the nose leading diagonally down towards the mouth and chin.
If there is space between the line and the top lip, the lip needs to be moved out more.
Mask the top part of the face once you’re done with the top lip ad start moving the bottom lip outward.
Keep in mind that the bottom lip won’t be as pulled outward as the top lip.


With the Pinch brush (BPI) pinch the middle of the mouth.
With ClayBuild up add some clay on the top sides of the mouth.
Use DamStandard to make the indents on the sides.


With DamStandard + Alt draw out the chin.
Add clay on the top below the bottom lip and smooth it out.
With the Move brush adjust the chin if need be.


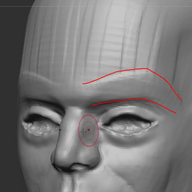
On the side of the head add clay at the beginning of the forehead leading down to the eye and take away some clay on the side.
Add clay leading down the cheekbone and the side of the nose to connect it with the rest of the face.
Carve out the eyesockets using Alt + BCB.


Adjust the jaw a bit with the Move brush, bringing it upward.
With ClayBuild up add some clay on the side where the jawbone would be.
Use DamStandard to draw out a line leading from the side of the nostrils down to the lip.
After drawing out the line add clay on top and below the line where the top lip is.


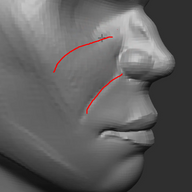


With Alt + DamStandard make the two lines beneath the nose that are sticking out and one carved line in the middle.
From a bottom view use Alt + ClayBuild up to make the holes for the nostrils.
With the Move brush adjust the shape of the nose front bottom and sides.


Move the lips more up towards the face if they are too low.
Add more clay on the top side of the lip below the cheeks and below the indent of the mouth.


Add more clay on the side of the forehead and take away some clay above the eyes on the forehead itself.
With the Move brush adjust the jaw by dragging it outwards from the side to create a more square shape on the face.
Add clay on the top part of the eyesocket and use the Polish brush to smooth out the top of the cheek.


Continuing on with the face, we’re going to add a cylinder into the workspace, rotate it 90 degrees and squish it.
While having the gizmo turned, hold down the Ctrl key and move the cylinder to create 4 more copies next to each other.
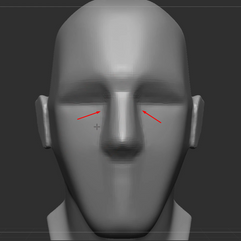
We need this to measure the length of our eyes for the model.
Once you’ve made the copies, center the pivot, scale down the row of cylinders, and move them in front of the face where the eyes are.
The row needs to end from the start of each ear.
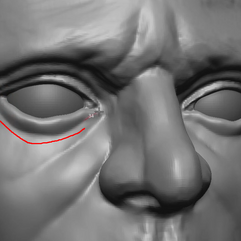
With DamStandard, draw the lines between the cylinders that are between the one cylinder in the middle of the row, now we know how wide the eyes should be for the face.


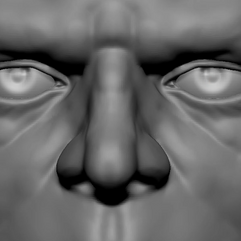
Add clay where the eyes would be and smooth it out.
Most people do the mistake of drawing the shape of the eye perfectly curved but in reality, the eye has more straight lines to it than people think.
With DamStandard draw out the shape of the eye and mask them using the Masking Pen.
Ctrl and click on the side to reverse the masking, Alt, and click where the eye is from the side to move the gizmo pivot to that spot.
While still holding down Alt, click the rotate sign above the gizmo to rotate it, and then just move the masked part inside the face.
Use ClayBuild up to carve out more of the eyesocket.


With DamStandard make two lines at the end of the eye and at the caruncle.
With the StandardBrush add clay below the eye to add volume to the bottom of the eyesocket.
To make the eyelids use DamStandard and make a brush stroke above the eyes.
To make the edges of the eye more crips, hold Alt + DamStandard and make a brush stroke on the edge of the eye.
From above, use the Move brush to pull out the eyelid or the top of the eye.
With a smaller brush, use the Standard brush to make the same stroke we did before this time on the lower eyelid.


Add more clay with ClayBuild up on the forehead and on the eyebrows to create the eyebrow bone.
Make sure the shape of the eye is correct and adjust it with the Move brush from time to time to keep the shape consistent.
Append a sphere and scale it down to make the eye itself and palace it in one of the eye sockets.
From here we have a better understanding of how the socket is supposed to look.
From the top view, use the Move brush and move out the bottom of the eye.
With DamStandard draw out indents below the eyes.


Select the eye and duplicate it by Mirror and Welding them inside of Modify Topology.
Again with DamStandard go over above the eyelid.
With the Move brush lift up the eye a bit from the sides and from above the cheek.
Use Alt + DamStandard to outline the lips again and just DamStandard to go over the middle line below the lower eyelid.
With ClayBuild up add some more clay on the jawbone and on the side of the cheek while taking away some clay in the middle of the jaw and cheeks where the skin sinks in.
For the eyebrows add more clay to make a bit of a stern expression on the face.


DynaMesh the head on a slightly higher resolution and go over the eyelids with DamStandard again.
With the Move brush move the lower eyelid a bit outward.
Use DamStandard to carve out the eye caruncle.


With the Move brush and from a lower angle tuck in the sides of the eye while moving the middle part of the eyelid out.
Mask the eye and use the Standard brush to add clay above the eyelid since we have a small amount of fat around that area.


With DamStandard draw out the line above the new amount of clay we added to create the skin above the upper eyelid.
Again with the Standard brush add more clay above the line we made.
With the Move brush grab the side of the head above the eye and move it down where the skin rests on top of the upper eyelid.


With DamStandard go over the top of the upper eyelid to add more volume to the skin on that part.
With Alt + ClayBuild up take away a small amount of the clay from the side that we just added and lightly smooth it.
Add more clay to the eyebrows and take away some clay above them.


Use DamStandard to make the skin folds at the corners of the eyes.
Do the same thing for the forehead at the eyebrows.
Outline the lower eyelid again and make lines coming from the corner of the caruncle down the cheek.


With the Move brush adjust the form of the nose, making the tip have more volume.
With DamStandard draw out the 3 circles on the nose, the two from the side and the one on the very tip of the nose.
Use the Polish brush to flatten out the sides of the nostrils, the sides on the tip, and below the nose where the opening of the nostrils are.


DynaMesh the face on a higher resolution.
In the middle of the cheek add some clay with ClayBuild up.
With DamStandard make two lines, one on the side of the cheek and another one curving near the mouth.
With ClayBuild up add clay inside the lines.
With the Move Topology brush adjust the form of the eye.
Add clay on the side below the eye.


With the flatten brush flatten the lower eyelid and afterwards outline the bottom again suing DamStandard.
Repeat the same process again for a second time, this time adding another outline on the side of the lower eyelid.
Mask the upper eyelid and invert the mask then with the Inflate brush inflate the unmasked part.
Add more clay on the side of the mouth and above the lip to refine the shape and sculpt.
For the chin use DamStandard to make an indent in the middle of the chin then smooth it out.


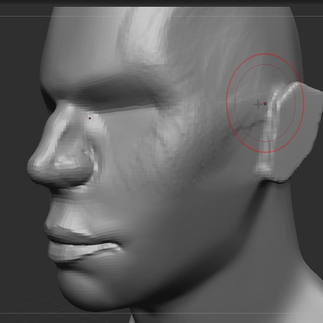
Lastly, cut the ears off using the Knife Curve and add new ears using the IMM BParts brush.
Adjust the ears using the gizmo or the Move brush and afterward DynaMesh the model to close up any gaps near the ears and the head, cleaning up any excess clay that might be sticking out of the head using Alt + ClayBuild up.


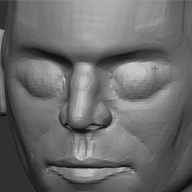
End Result.

Bonus - Mouth Opening
For this bonus class, we’ll make a hole or mouth cavity inside a head.
Append a sphere into your workspace and turn on Transparency with Ghost.
Scale down the sphere and move it as close to the mouth as possible without the sphere sticking out of the lips.
Squish it down a bit so it isn’t a perfect sphere.


From here turn off the Transparency and use Alt + DamStandard and draw out the lip line in the middle till some of the clay from the sphere starts to stick out.
You can use DynaMesh on a medium resolution to get a better result.
When some of the shere is sticking out, use the Move brush to adjust it so when we use Boolean it won’t take away some parts of the mouth we need.


When the line is in place, turn on the Live Boolean and subtract the sphere.
Make sure that the sphere is below the head when doing this.
We can see now that there is a small hole between the lips and when we look inside we can see the mouth cavity we’ve created.
To finalize the Boolean click on Make Boolean Mesh inside the Subtool tab.
A new mesh will appear that start with UMesh, this is the Boolean we’ve created.
Click on the new mesh that we’ve made and we can see the head has a hole inside the mouth.


Bonus - Merging the Body and Pupils
Now that we’ve made our head we can prepare it to be merged with the rest of the body from the previous class.
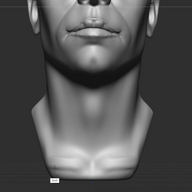
First, we want to finish up the neck before we merge it.
With ClayBuild up add clay on the side of the neck to make the neck muscles.
With the same brush, we’ll make the adam’s apple by sculpting a diamond shape and using DamStandard to carve out two lines between the adam’s apple.
We’re going to do the same thing for the neck muscles, to make them more noticeable, use the DamStandard brush and draw out two lines between the muscle.


Lastly, we're going to make the collarbone, add clay below the neck, use the Move brush if the collarbone is too high, and then with a big brush, use the Flatten brush to flatten the front of the collarbone a bit.


Delete the cylinders we’ve used to measure the width of the eyes before we save the head as a Tool instead of a ZBrush Project file.
To do that we need to save the head from the Tool menu on the upper right corner.
Click on the Saves As button and save the head anywhere on your desktop.
Double-click on the head tool that you’ve saved and it will load into the project inside the Tools.
Select the head and click on the Copy button inside the subtool.
Open up the male anatomy from the side in the tools and paste the head there by clicking the Paste button inside the subtool.


At first, we won’t be able to see the head at all and this is because the head is too small or somewhere else inside the workspace.
If we turn on the Gizmo we can see that it isn’t on the head itself.
To fix this, hold down Alt and press the relocate button on top of the Gizmo and then on the rotate to fix the Gizmo’s rotation.


Scale up the head and turn on the Transparency with Ghost and move the head in place.
Once it’s in place, hold Ctrl + Shift and use the Select Lasso to select the head of the body so that we can delete it.
Before letting go of the Lasso selection, hold down Alt so the selection turns red, this means it will hide the head.
Once the head is hidden, go into Geomtery, Modify Topology, and click Del Hidden.
Adjust the head with the rest of the body by using the move brush, you can also move around the body to fill out any holes.
This is a good time to check on the hands and feet, if some parts are sticking out or there are viable holes, use the Move brush to fix those issues.


After we are done filling up any holes, activate the Live Boolean and make a Boolean Mesh.
Open the UMesh from the subtool, copy it, and paste it back into the project with the separate parts in them.


Instead of DynaMeshing to try and fix the geometry we can instead activate the Sculptris Pro Mode.
With this mode, we can add topology while using any brush.
If the brush is smaller it will add more topology, if the brush is bigger it will add less topology.
We can use this with the Smooth brush to equalize the topology between the merged parts like the head, hand, and legs.
While having the Smooth brush active adjust the brush to a midpoint and start smoothing out the areas around the neck, wrists, and ankles.


Lastly, we can define the body a bit more and fix up anything that got lost during the making of the Boolean Mesh.
Draw out the collar bones again and use the DamStandard to make the chest muscles stand out more.


The finishing touch is the eyes.
DynaMesh the eyes on a medium resolution.
Turn on the Standard brush and change the Dots to DragRect and the Alpha to Alpha 01.
Turn up the brush Intensity or the Z Intensity before dragging out the circles on the eyes by holding down Alt and using the Standard brush.
After making the holes in the eyes, stop holding Alt and use the brush without it to drag in the dots for the irises.