
🟠In today's tutorial, we teach the basics of importing textures and models inside of Marmoset Toolbag.
🟠Learn how to prepare your ZBrush models in quick and short steps to speed up your workflow.
🟠Find out the importance of choosing the correct Color Profile for your textures before exporting them.
- Workflow
To quickly prepare a model for Marmoset, we can open UVs for the model inside of ZBrush if the model has low and high divisions.
In the Subtool, click on the All Low button to lower daw the divisions on each subtool to the lowest one.
After that, open the Zplugin tab, open the UV Master tool, select the Polygroups unwarp if your model has good polygroups, then click the Unwrap All button.
Let the model finish loading in the UVs.
After they’ve loaded in, export the model on one division higher than the lowest so it isn’t too low poly.
If the model has too low of a topology, some of the accessories and features will be off even after the baking process in Substance Painter.
Granted, this type of model is meant to be used in a showcase rather than a game-ready character.


In Autodesk Maya, import the model from ZBrush.
Assign the head and body their own lambert material.
Name each material appropriately so it can help you with texturing in Substance Painter.


When it comes to multiple parts like the belt and shoulder plates, we can assign one material to every piece on the belt.
Select all the parts on the belt, group them by using the Ctrl + G shortcut, then assign them a material.
Assigning different parts of the model their own material, will not only help us during texturing but also help us in the baking process.
Because all the parts of the belt are on one material, we need to place all the UV Shells so they don’t overlap each other.
If they are overlapping, dark spots will appear on the model after the bake.


Assing materials for other parts of the orc to your liking.
If you forget which parts were in one material, or shader, open the Hypershade.
Here you can see all the material currently on the model or materials you’ve made and aren’t using.
To know which material covers what parts, hover over a material in the Hypershade with the curser, hold down Shift, and right-click, then select the Select Objects with Material.
It will select all the parts of the model that are currently using that shader.


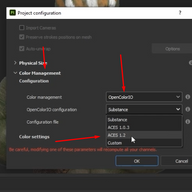
In Substance Painter, you can change the Color profile into ACES when importing a file.
If you forget to do this, you can do it after texturing by going into the Project Configuration options and changing the Color profile from there by opening the Color Management options, changing the Color management to OpenColorIO, then changing the OpenColorIO configuration to ACES 1.2.
Before exporting the textures choose where you want to save them on your desktop, the Outpu Template, file type, and size.


Marmoset has a similar UI to the ones we’ve seen in previous 3D softwares.
These are the movements you can do inside Marmoset: 1. Alt + middle mouse button will move the camera 2. Shift + right click moves the light 3. Alt + left mouse button moves the object 4. Alt + left mouse button zooms the camera in and out 5. Scrolling on the middle mouse button also zooms the camera in and out
On the left side is where you can see how many cameras, lights, and objects are in your scene.
On the right side, you’ll see all the materials from your model.
The Render inside the scene outliner is where the render details and settings are.
When you click on the Default material, you’ll see where all the texture maps need to be placed.
Each texture map can be edited directly inside of Marmoset.
On the top left corner are all the viewports.
The Classic view is the starting viewport. Animate is for animating the movement of the camera or model and comes with keyframes and a timeline.
You can also play already-made animations on your model from there as well.
The Render view has two camera views, one is for the render camera and the other one is for the perspective camera where we can change the position of the light sources we put around the model.
This is so we don’t have to move the positioned shot from the render camera and provides an overview of how the render looks when we change the light sources around.
The Setup is the same thing as the Render view but comes with multiple sides.
The Texture view is for texturing the model but we’ll always have an already textured model anyway and won’t be using this view.


To import a model inside of Marmoset, you can either do it from the File tab or click on the box icon in the Scene outliner.
When you import the model, all the materials added from Autodesk Maya will appear in the Materials tab on the side, just like in Substance Painter.
In the Scene outliner, click on the camera icon to add a new camera in the scene, name it MainRender to know that that camera is going to be used to set up the render shot.
On that camera, change the Tone Mapping from Linear to ACES inside the camera setting.
The colors will be more vibrant this way.
If you change the settings on one camera it will only be applied on that single camera, all the other cameras in the scene won’t be affected by that change.
Click on the ‘head’ material on the right side and click on the Normal Map square inside of Marmoset.
The File Explorer will open and you can select the folder with your textures from Substance and place them inside of Marmoset.
You’ll need to do this one by one for each texture map on each material.
You can also drag and drop the exported textures in the texture maps.
Flip the Normal map on the Y channel because in most cases Marmoset will import the Normal map not flipped correctly.


For the base color map, drag and drop it inside the Albedo Map.
Since we have a height map on the character, we need to enable the Displacement inside the material.
Click the little arrow on the side where the Displacement is, then select the Height option.
It will activate the Displacement map where you can drag and drop the Height.
You can use the scales in the Displacement map options to control how intense you want the height map to be.
Enabling the Generate normals inside the Displacement options will have a better effect on the height.
Drag and drop the Roughness inside the Roughness Map.
If you want to have better control over how intense the roughness is, change the Channel from R to A and it will work just like in Substance Painter where all the way to 1 it will have no roughness while the lower you go it will have more roughness.
Now that you know the placements of each map, drag and drop each texture map in its own materials inside Marmoset and that is all for this tutorial!


Bonus - adding details and Subsurface Scattering in Marmoset
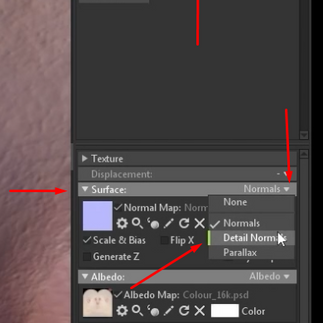
In this bonus, we’re using a 3D-scanned head.
It has a lot of details on the skin such as the pores that are coming from the Normal map.
We can add more details by adding another Normal map to the model.
Make sure you are on the correct material, click on the small arrow on the right side of the Surface map, and click the Detailed Normals.
A space for another map will appear in the same channel.
Inside this map, drag and drop the Micro_Normal map.
At first, the map is going to be too large, with the Detail Tiling scale we can increase the tiling to be smaller and fit the model.


We can also add Subsurface scattering directly inside of Marmoset if we haven't done that before inside of Substance Painter.
Subsurface scattering is when light passes through the skin, specifically, this can be noticed around the ear, nostrils, eyelid, between the fingers, or anywhere where the skin is thinnest.
In the Reflection channel, click the small arrow on the right side and select the Volumetric Scattering.
Volumetric Scattering is the same as Subsurface scattering but it is more advanced and will give better results.
The model will suddenly look pale, that is because we haven’t adjusted the Scatter Depth scale.
The scale controls how much light will pass through the model.
Before adjusting the Scatter Depth, make sure the light is coming from behind the model.
Lowering down the Scatter Depth will increase the light passing through the skin.
Turning on Raytracing from the Render settings will give a better preview of how the model is being affected.
If you want the scattering to be more intense, lower or adjust the Antisotropy scale.


